<?xml version="1.0" encoding="UTF-8"?><feed xmlns="http://www.w3.org/2005/Atom" xmlns:dc="http://purl.org/dc/elements/1.1/">
                                        <id>https://www.nordicbakebox.com.au/blog</id>
                                            <link rel="self" href="https://www.nordicbakebox.com.au/blog"></link>
                                <title><![CDATA[BLOG]]></title>
                                                                                                                <updated>2025-02-06T21:19:23+00:00</updated>
                        
            <entry>
            <title><![CDATA[The secret to a good dough]]></title>
            <link rel="alternate" href="https://www.nordicbakebox.com.au/blog/baking-tips/the-secret-to-a-good-dough" />
            <id>https://www.nordicbakebox.com.au/blog/baking-tips/the-secret-to-a-good-dough</id>
            <author>
                <name><![CDATA[Isabelle Melville]]></name>
                                    <email><![CDATA[isabelle@nordicbakebox.com.au]]></email>
                            </author>
            <summary type="html">
                <![CDATA[<h5><strong>Do you know what Gluten is?</strong></h5>
<p><span style="font-weight: 400;">Gluten is a protein found in wheat and rye. The reason gluten is important in baking with dough is that it makes the dough easier to work with and improves its ability to rise. The wheat gluten has the best baking properties and ensures good rising and results in a light, airy bread.</span></p>
<h3> </h3>
<h5><strong>What is the secret to a good dough?</strong></h5>
<p><span style="font-weight: 400;">One of the main goals in bread baking is to develop </span><strong>gluten threads!</strong><span style="font-weight: 400;"> The threads act as walls that trap air bubbles formed during proofing, making the bread or buns light, fluffy and soft. Gluten threads form when the dough is kneaded. As you knead, protein chains in the gluten start to bond. At first, many </span><strong>weaker threads</strong><span style="font-weight: 400;"> form. If you stop kneading too soon, the dough won’t be strong enough to rise properly over time. But, with continued kneading, these weaker threads </span><strong>break and reform into stronger ones</strong><span style="font-weight: 400;">. This is why dough becomes firmer and more elastic the longer you knead it.</span></p>
<p> </p>
<h5><strong>How Do I Know my dough has had enough kneading?</strong></h5>
<p><span style="font-weight: 400;">The dough should start being less sticky and easier to handle and get a slight shine. But to check for sure, that your dough has been kneaded enough, take a small piece of dough, roll it to a ball and gently stretch it between your fingers. If the dough </span><strong>stretches thinly without breaking</strong><span style="font-weight: 400;">, forming a see through "gluten window," it’s ready. The dough should feel elastic. If the dough </span><strong>tears easily</strong><span style="font-weight: 400;">, it needs more kneading. Simply roll it back into a ball and continue kneading for a few more minutes.</span></p>
<p> </p>
<h5><strong>\u26a0\ufe0f Beware of Over-Kneading!</strong></h5>
<p><span style="font-weight: 400;">If your dough passes the test but you keep kneading, the </span><strong>strong gluten bonds may start to break down</strong><span style="font-weight: 400;">. This results in a slack, sticky dough that loses its structure and "spreads out." Overworked dough won’t hold its shape and may not rise properly.</span></p>]]>
            </summary>
                            <link rel="enclosure" href="https://static.subbly.me/fs/subbly/userFiles/nordic-bakebox/images/a-59-gluten-17388771416816.jpeg" length="24978" type="image/jpeg" />
                        <category term="Baking tips" />
            <updated>2025-02-06T21:19:23+00:00</updated>
                            <dc:description><![CDATA[the secret to a good dough, through knowing about gluten and what to look for]]></dc:description>
                    </entry>
            <entry>
            <title><![CDATA[Make This Halloween Extra Sweet with Homemade Treats]]></title>
            <link rel="alternate" href="https://www.nordicbakebox.com.au/blog/make-this-halloween-extra-sweet-with-homemade-treats-1" />
            <id>https://www.nordicbakebox.com.au/blog/make-this-halloween-extra-sweet-with-homemade-treats-1</id>
            <author>
                <name><![CDATA[Isabelle Melville]]></name>
                                    <email><![CDATA[isabelle@nordicbakebox.com.au]]></email>
                            </author>
            <summary type="html">
                <![CDATA[<h2><span style="font-size: 30px; font-family: Raleway;">Why Baking is the Perfect Halloween Activity</span></h2>
<p><span style="font-family: Raleway;">Halloween baking isn’t just about making sugary treats; it’s about creating memories, spending time with loved ones, and enjoying the simple pleasures of working with your hands. Plus, your treats don’t have to be complicated—simple recipes can yield impressive results and it gives your children a sense of pride!</span></p>
<p> </p>
<p><span style="font-family: Raleway;">Baking together also lets you get creative with decorations—think spiderwebs on chocolate cake, pumpkin shaped bread or ghost shaped cookies. So roll up your sleeves and dive into a fun, hands-on Halloween activity that everyone can enjoy.</span></p>
<p> </p>
<h3><span style="font-size: 24px; font-family: Raleway;">Nordic Baking Traditions with a Halloween Twist</span></h3>
<p><span style="font-family: Raleway;">You might be wondering how Nordic baking fits into Halloween, a holiday often associated with American traditions. Here’s the fun part—Nordic baking often incorporates natural, wholesome ingredients that can easily be adapted to Halloween-themed goodies. Imagine rye bread shaped as a pumpkin or ghost gingerbread.</span></p>
<p><span style="font-family: Raleway;">Our Nordic recipes use quality organic ingredients like rye flour, cinnamon, cardamom, and other beautiful spices—perfect for making Halloween treats that feel indulgent yet grounded in wholesome goodness.</span></p>
<p> </p>
<h3><span style="font-size: 24px; font-family: Raleway;">Fun and Easy Halloween Recipes for Families</span></h3>
<p><span style="font-family: Raleway;">Looking for some easy Halloween recipes to try at home? Here are a few fun ideas to get you started:
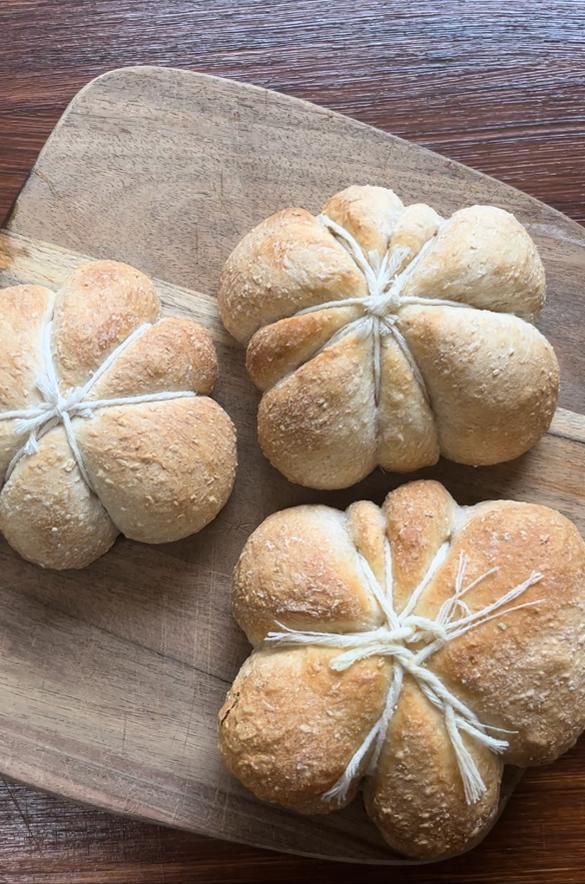
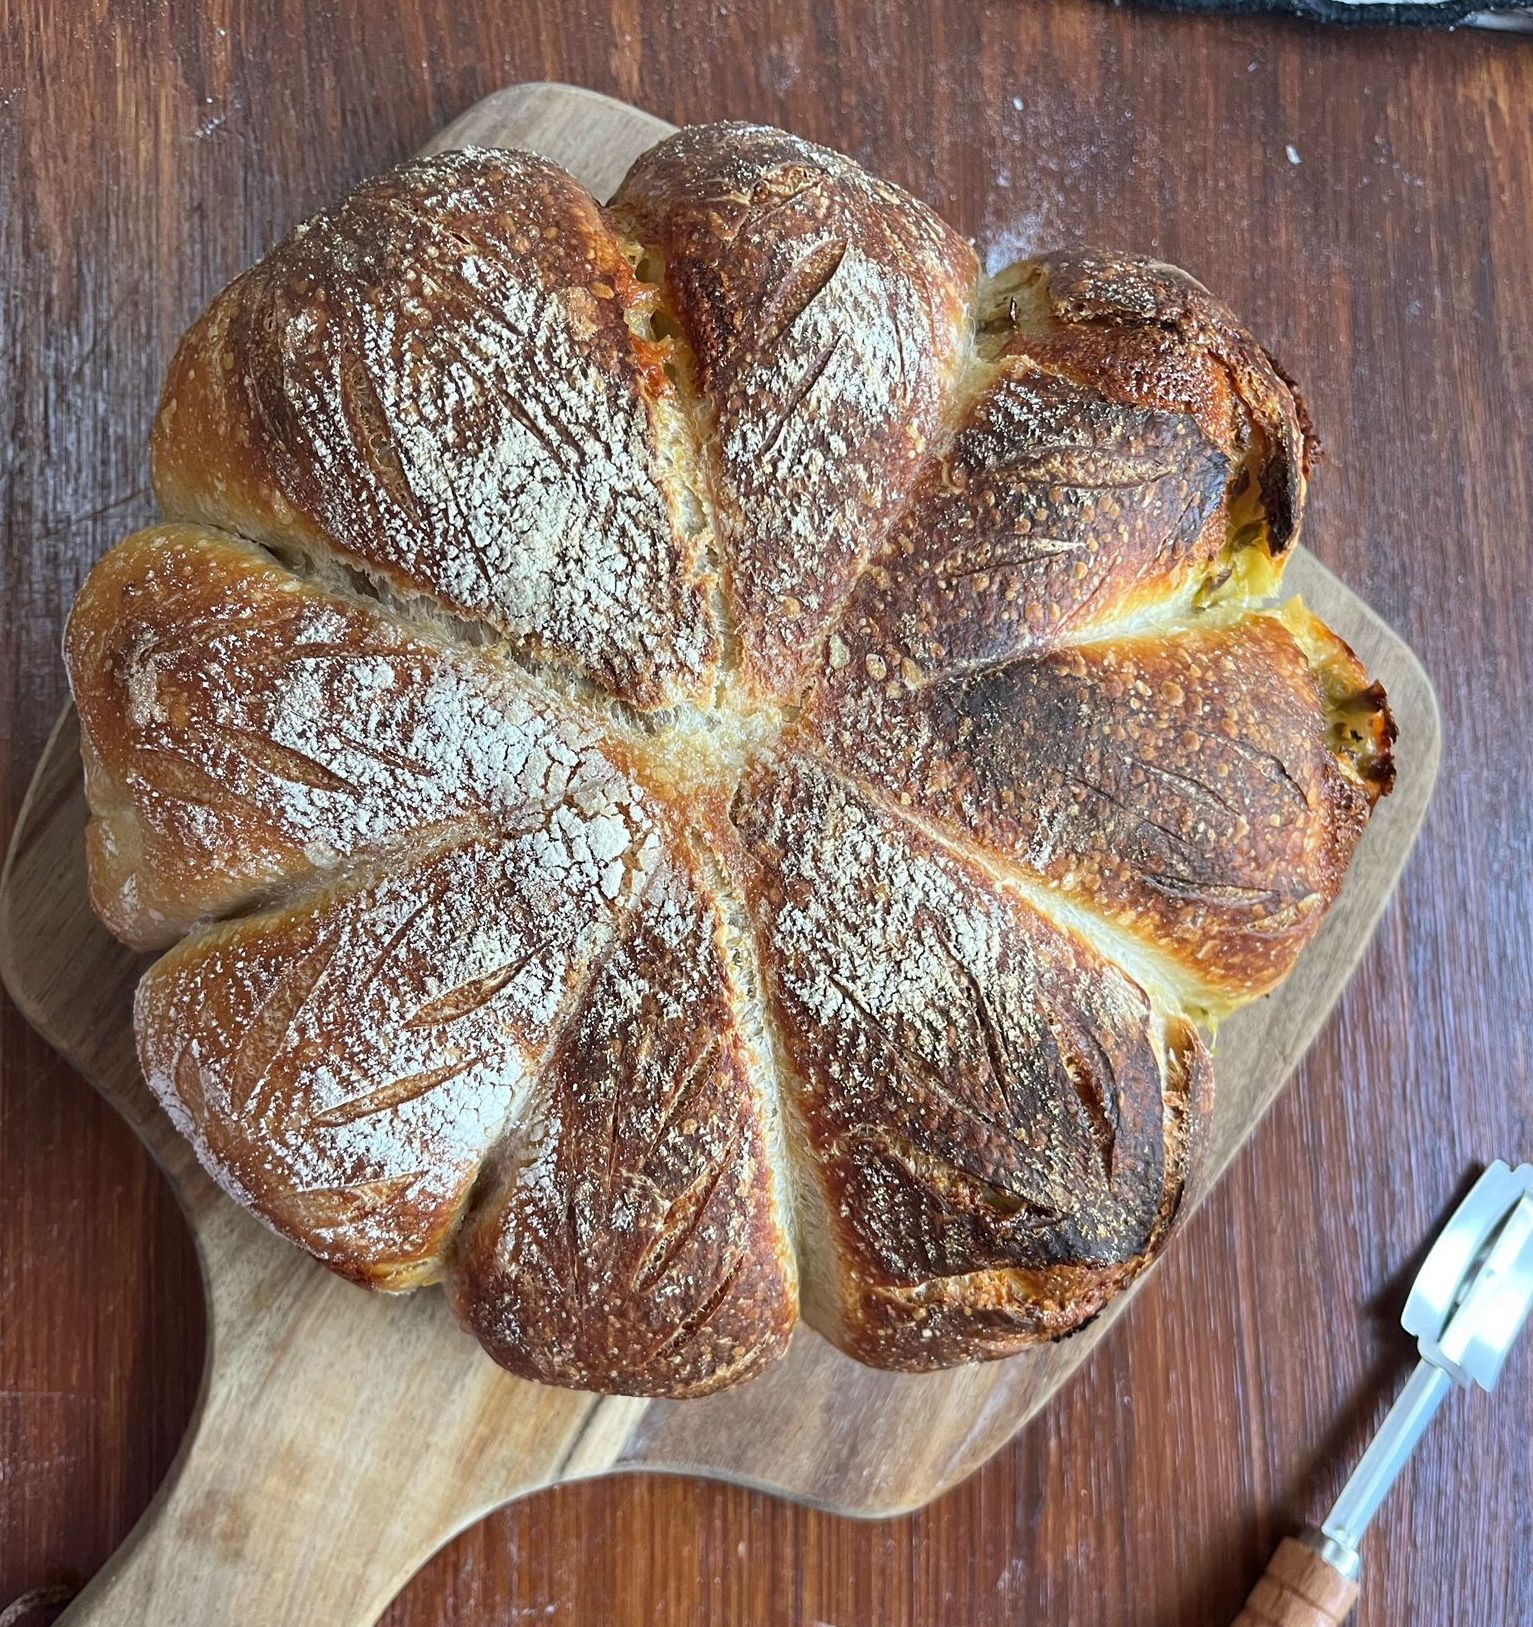
</span></p>
<p> </p>
<h4><span style="font-size: 20px; font-family: Raleway;">Pumpkin Rye Bread</span></h4>
<p><span style="font-family: Raleway;">
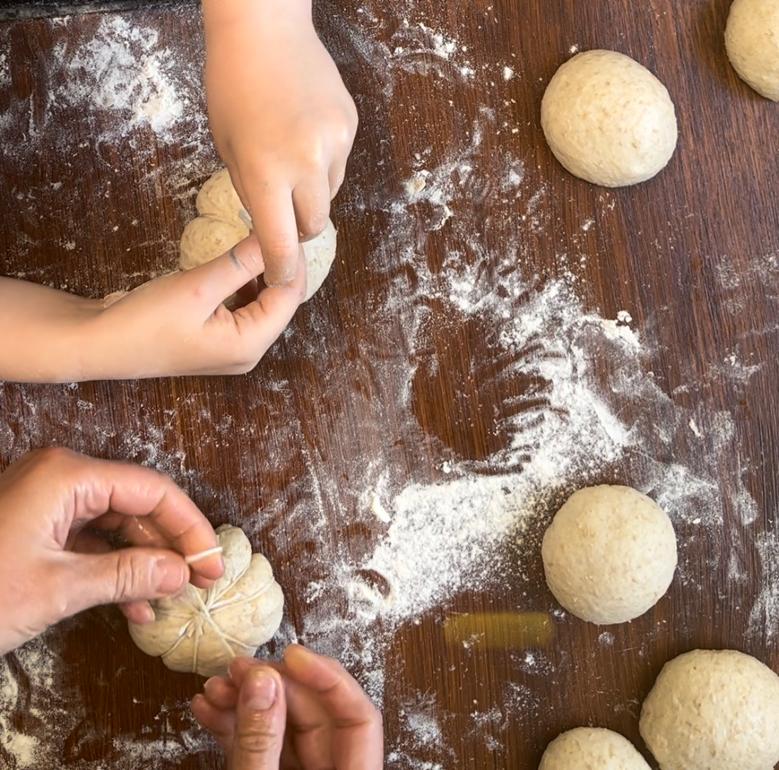
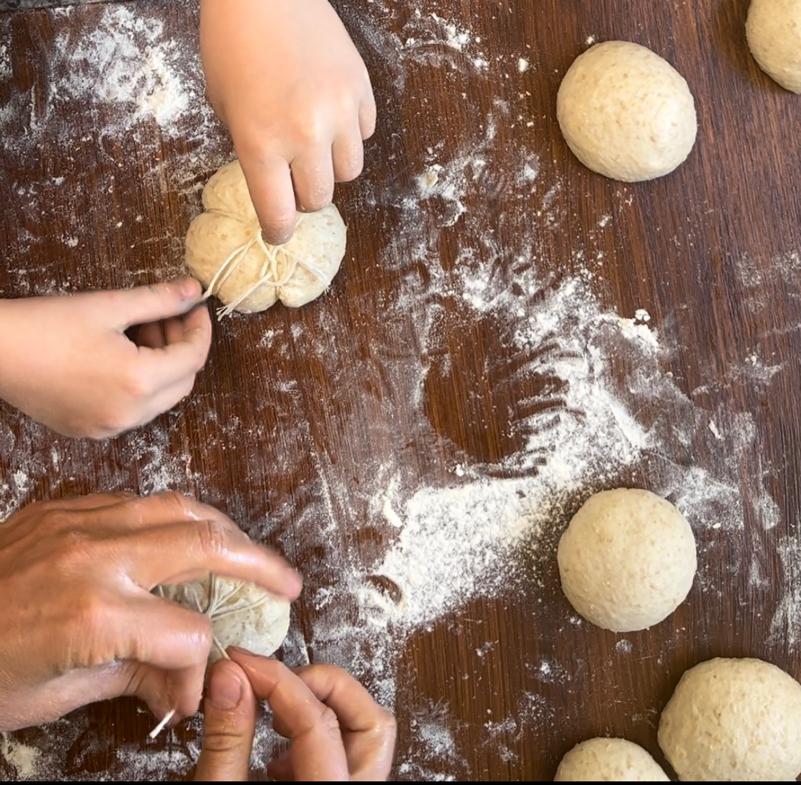
Rye bread is a staple of Nordic baking, and for Halloween, you can give it a festive twist! Use one of our bread baking kits to make a rye loaf, then shape the dough into a pumpkin by using heat proof string to create a charming pumpkin design.</span></p>
<p> </p>
<p><span style="font-family: Raleway;">Cut four pieces of baking string, each about 50cm long, and arrange them in a criss-cross pattern on a baking tray lined with parchment paper.</span></p>
<p><span style="font-family: Raleway;">Place the loaf on top of the twine, smooth side facing up. Tie each piece of twine around the loaf loosely, allowing space for the bread to rise and expand. Trim any excess string, and your pumpkin-shaped bread is ready for the oven!</span></p>
<p><span style="font-family: Raleway;"><img src="https://static.subbly.me/fs/subbly/userFiles/nordic-bakebox/uploaded-media/pumpkin-17294875080121.jpg" alt="pumpkin bread" width="316" height="335" data-width="316" data-height="335"></img></span></p>
<p> </p>
<h4><span style="font-family: Raleway;">
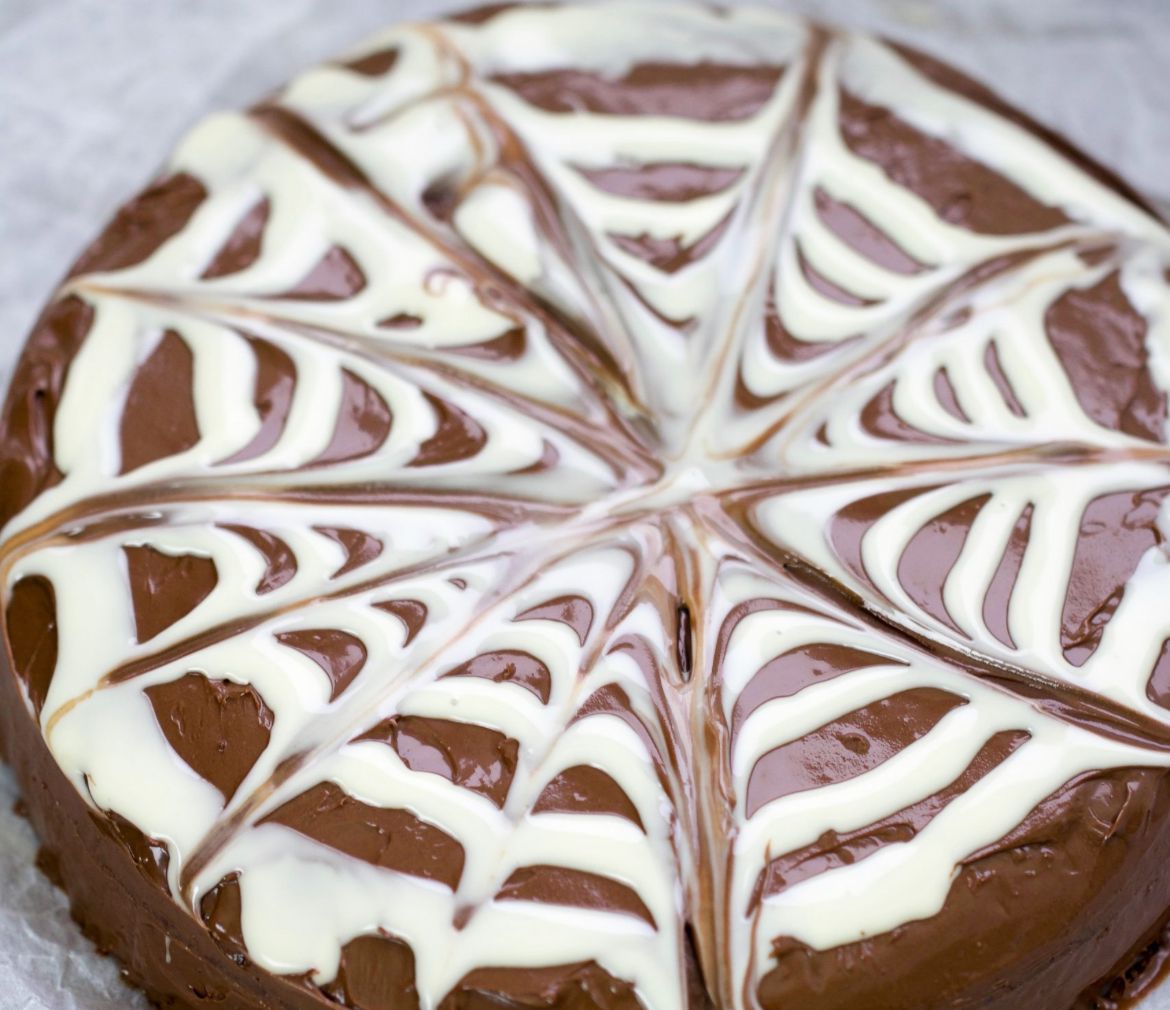
Ghostly Kladdkaka (Swedish Chocolate Cake)</span></h4>
<p><span style="font-family: Raleway;">Kladdkaka, a rich and gooey Swedish chocolate cake, is perfect for Halloween. You can make it extra spooky by adding a layer of chocolate ganache in the shape of a spider web!</span></p>
<p> </p>
<h5><span style="font-family: Raleway; font-size: 16px;">Ganache</span></h5>
<p><span style="font-family: Raleway;">Melt the ganaches by adding the ingredients together. Do this over low heat on the stove until everything is melted, or gently in the microwave. let the milk chocolate ganache stay in the bowl. Spread it on the cake directly with a spoon once the cake has completely cooled. Place the white ganache in a small piping bag and cut a small hole in it when it's time to use.</span></p>
<p> </p>
<h5><span style="font-family: Raleway; font-size: 16px;">Milk Chocolate Ganache</span></h5>
<ul>
<li><span style="font-family: Raleway;">100 g milk chocolate</span></li>
<li><span style="font-family: Raleway;">50 g whipping cream</span></li>
</ul>
<h5><span style="font-family: Raleway; font-size: 16px;">White Chocolate Ganache</span></h5>
<ul>
<li><span style="font-family: Raleway;">50 g white chocolate</span></li>
<li><span style="font-family: Raleway;">20 g cream</span></li>
</ul>
<p> </p>
<p><span style="font-size: 16px; font-family: Raleway;">So how do you do it?</span><br><span style="font-family: Raleway; font-size: 14px;">First, use our Kladdkaka baking kit to make the Kladdkaka according to the instructions. Once your cake is ready, spread the milk chocolate ganache evenly over the entire cake. Immediately after, take the white ganache and create about 4-5 circles starting from the center and working your way out, leaving a gap of 1-2 cm between each circle. Once that’s done, take a skewer and draw from the center to the edge. (It’s similar to cutting a piece of cake, but you just make a defined stroke in the chocolate.) This is how the spiderweb effect forms. Then, put the cake in the refrigerator so the ganache can set a bit before serving.</span></p>
<p><img src="https://static.subbly.me/fs/subbly/userFiles/nordic-bakebox/uploaded-media/spiderweb-17294872496665.jpg" alt="spider web cake" width="321" height="277" data-width="321" data-height="277"></img></p>
<h4><span style="font-size: 20px; font-family: Raleway;">
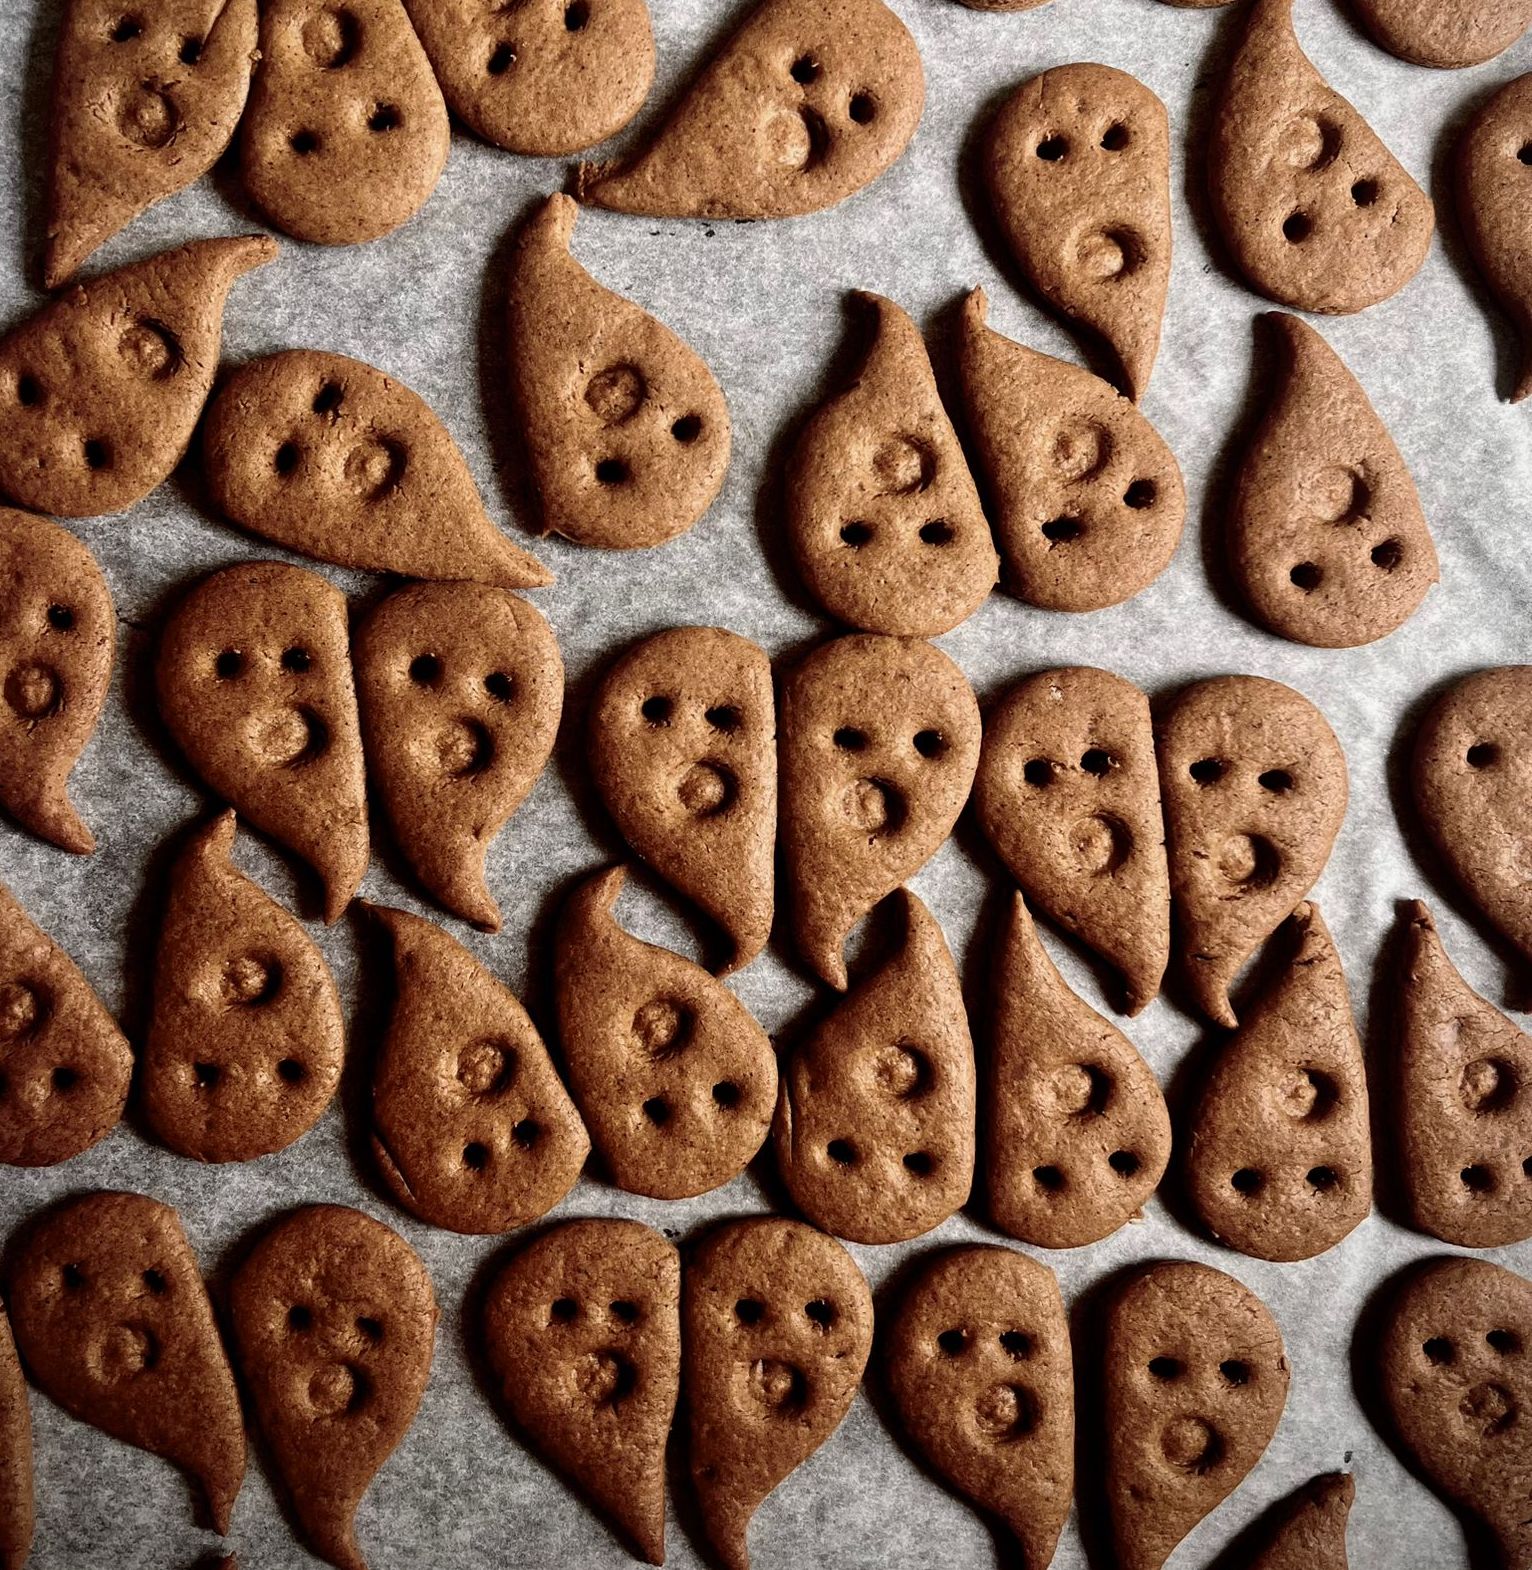
Spooky Gingerbread Ghost Cookies</span></h4>
<p><span style="font-family: Raleway;">These adorable gingerbread cookies are perfect for Halloween! Start by using a heart-shaped cookie cutter to create your cookies, then cut the hearts in half. Make holes for eyes and mouths to transform them into spooky ghost faces! Decorate with icing sugar. The warm spices and texture make these treats a delicious favourite for both kids and adults, sure to be a hit this Halloween!</span></p>
<p><img src="https://static.subbly.me/fs/subbly/userFiles/nordic-bakebox/uploaded-media/ghosts-17294874882577.jpg" alt="ghost cookies" width="298" height="305" data-width="298" data-height="305"></img></p>
<h2><span style="font-size: 30px; font-family: Raleway;">The Benefits of Using Organic Ingredients</span></h2>
<p><span style="font-family: Raleway;">When you bake at home, you get to choose the quality of the ingredients you use. By opting for organic ingredients from Nordic Bakebox, you’re not only supporting healthier, more sustainable farming practices, but you’re also giving your family wholesome, nutritious treats. Our pre-measured kits include organic flour, sustainable premium chocolate and spices that make all the difference—not just in taste, but also in knowing you’re baking with care.</span></p>
<p> </p>
<h3><span style="font-size: 26px; font-family: Raleway;">Make This Halloween a Celebration to Remember</span></h3>
<p><span style="font-family: Raleway;">This Halloween, take your baking game to the next level with a mix of spooky creativity and wholesome ingredients. Whether you're baking with kids or hosting a grown-up Halloween gathering, these recipes are sure to add a special touch to the festivities. Let your imagination run wild—decorate with ghosts, ghouls, and pumpkins, and most importantly, have fun with it!</span></p>
<p><span style="font-family: Raleway;">And remember, you don’t need to be a master baker to create something magical. With the right ingredients and a little Halloween spirit, you can turn your kitchen into a spooky, delicious wonderland.</span></p>
<p> </p>
<hr></hr>
<p> </p>
<h3><span style="font-size: 24px; font-family: Raleway;">FAQs</span></h3>
<p><span style="font-family: Raleway;">Q: Do these Halloween-themed treats take a long time to make?</span><br><span style="font-family: Raleway;">A: Not at all! Many of the recipes, like a Kladdkaka, can be made in under an hour, making it perfect for a last-minute Halloween party.</span></p>
<p><span style="font-family: Raleway;">Q: What makes Nordic baking different from regular baking?</span><br><span style="font-family: Raleway;">A: In Nordic Baking we often uses simple, wholesome ingredients like organic rye, oats, and dark chocolate, focusing on rich flavours with less sugar compared to many american-style buns and desserts.</span></p>
<p> </p>
<p> </p>
<p> </p>
<p> </p>
<p> </p>
<p> </p>
<p> </p>
<p> </p>]]>
            </summary>
                            <link rel="enclosure" href="https://static.subbly.me/fs/subbly/userFiles/nordic-bakebox/images/a-58-ghosts-17294875288333.jpeg" length="613011" type="image/jpeg" />
                        <category term="Uncategorised" />
            <updated>2024-10-21T04:21:21+00:00</updated>
                            <dc:description><![CDATA[Discover fun Halloween baking ideas that blend Nordic traditions with high-quality organic ingredients. Whether hosting a spooky gathering or family fun, create delicious treats that capture the spirit of the season!]]></dc:description>
                    </entry>
            <entry>
            <title><![CDATA[Freshly Baked Cinnamon Buns for Breakfast: A Quick Guide]]></title>
            <link rel="alternate" href="https://www.nordicbakebox.com.au/blog/freshly-baked-cinnamon-buns-for-breakfast-a-quick-guide" />
            <id>https://www.nordicbakebox.com.au/blog/freshly-baked-cinnamon-buns-for-breakfast-a-quick-guide</id>
            <author>
                <name><![CDATA[Isabelle Melville]]></name>
                                    <email><![CDATA[isabelle@nordicbakebox.com.au]]></email>
                            </author>
            <summary type="html">
                <![CDATA[<p class="p1"><span class="s1">Craving the warm, comforting aroma of freshly baked cinnamon buns to kickstart your morning? Look no further – we've got a simple and efficient way to achieve that freshly baked goodness right in your own kitchen.</span></p>
<p class="p1"> </p>
<h4 class="p1"><span class="s1"><strong>First some tips for the dough making.</strong></span></h4>
<p class="p1"><span class="s1">Bun doughs can be cold-proofed in the fridge overnight, as shaped buns. Genarally the longer the proofing time of a dough, the tastier the buns that stay soft and juicy longer.</span></p>
<p class="p1"> </p>
<p class="p1"><span class="s1"><span class="s1">For vegan buns You can easily replace the liquid in the dough with plant based milk, and the butter for plantbased margarine, it also makes really tasty buns. </span></span></p>
<p class="p1"> </p>
<p class="p1"><span class="s1">Use room temperatured soft butter! Don't use melted butter, as it becomes liquid in the dough, which requires more flour to handle, and more flour equals dry buns!</span></p>
<p class="p1"> </p>
<p class="p1"><span class="s1">Don't add more flour once the dough is finnished kneading. Then the flour won't get a chance to be worked into the dough and create gluten development which will give you dry buns. If the dough is loose, then put it in the fridge for an hour and it will be easier to handle. </span></p>
<p class="p1"> </p>
<p class="p1"><span class="s1">Rember to always do a gluten test to see if it is ready before you stop kneading, if the dough can't be stretched and breaks, it needs more kneading. Good gluten strength means that your dough will be able to rise better, and will give you fluffier and softer buns.</span></p>
<p class="p2"> </p>
<h4 class="p1"><span class="s1"><strong>To speed up the bun dough.</strong></span></h4>
<p class="p3"><span class="s1">Use room temperature ingredients. Then your dough will quickly reach the right temperature, and it's when the dough room temperature the yeast  will activate.</span></p>
<p class="p3"> </p>
<p class="p3"><span class="s1">When proofing you can  put a plastic wrap or a plastic bag over the oven tray with your buns so that it gets warm and cozy underneath, the dough likes a warm and humid enviroment.</span></p>
<p class="p3"> </p>
<p class="p3"><span class="s1">To really speed it up, make a proofing room in you oven. Place the trays in the cold oven with a cup of boiling water and let them proof in the steam.  </span><span class="s1">It's a good trick to use if you want to give the buns an extra boost, but keep an eye on your buns so they don’t over proof!</span></p>
<p class="p2"> </p>
<h4 class="p1"><span class="s1"><strong>Cold proofing or thawing already baked buns?</strong></span></h4>
<p class="p1"> </p>
<p class="p1"><span class="s1"><strong>Thawing already baked buns:</strong> </span></p>
<p class="p1"><span class="s1">Get fresh buns in the morning by immediately freezing them after they have been baked.<span class="Apple-converted-space">  </span>Then when you want to enjoy them, here’s a trick to thaw them for ultimate fresh buns. </span></p>
<p class="p1"> </p>
<p class="p1"><span class="s1">Preheat your oven to 250 degrees Celsius (or use an airfryer) While the oven is heating up, take your frozen cinnamon buns out of the freezer. Before placing them in the oven, brush the buns with a bit of milk. </span></p>
<p class="p1"> </p>
<p class="p1"><span class="s1">Place the buns on a baking sheet and bake them for just 4 minutes. After the short baking time, remove the buns from the oven and let them finish thawing under a kitchen towel.</span></p>
<p class="p1"> </p>
<p class="p1"><span class="s1"> It may take about 10 minutes for the buns to fully thaw, so be patient and resist the temptation to dive in too soon. </span></p>
<p class="p1"> </p>
<p class="p1"><span class="s1">With this quick and easy method, you can enjoy the irresistible taste and aroma of freshly baked cinnamon buns for breakfast without the hassle of starting from scratch.</span></p>
<p class="p1"> </p>
<p class="p1"><strong><span class="s1">Cold proofing: </span></strong></p>
<p class="p1"><span class="s1">Cold proofing is how bakeries do it. They put their unbaked buns right after they've been bade and let them proof in the fridge overnight so that they can bake them when they start working. </span></p>
<p class="p1"> </p>
<p class="p1"><span class="s1">There are several advantages to cold proofing. Firstly, it's good for the dough as it slowly develops and rises. Keep in mind that depending on how long the dough will proof, you might have to reduce the amount of yeast. The less yeast you have, the longer you can proof the dough. But if you're just proofing overnight, you don't have to reduce the yeast, you can use the same amount, at least if your fridge maintains a  normal temperature below 5 degrees Celsius.</span></p>
<p class="p1"> </p>
<p class="p3"><span class="s1">Your dough should have risen overnight, but it may also be that you don't notice much of a difference. That would be if you have a very cold fridge. But there's nothing to worry about, just because the dough hasn't risen doesn't mean it is ruined. And regardless of whether the dough has risen a lot or a little, it then needs a little time at room temperature before it's baked. </span></p>
<p class="p2"> </p>
<p class="p3"><span class="s1">If they haven’t risen at all during the night, let them proof for about hour in the kitchen before baking. So proofing dough in the fridge overnight is not necessarily a faster way to get the buns on the table, but might lead to tastier buns!</span></p>
<p class="p2"> </p>
<p class="p4"> </p>
<p class="p4"> </p>
<p class="p5"> </p>]]>
            </summary>
                            <link rel="enclosure" href="https://static.subbly.me/fs/subbly/userFiles/nordic-bakebox/images/a-56-whatsapp-image-2024-04-20-at-123937-17165196618337.jpeg" length="415765" type="image/jpeg" />
                        <category term="Uncategorised" />
            <updated>2024-05-24T02:36:04+00:00</updated>
                            <dc:description><![CDATA[Craving the warm, comforting aroma of freshly baked cinnamon buns or scrolls in the morning? we&#039;ve got a simple and efficient way  and techniques to achieve that freshly baked buns. Reheat or thaw buns.]]></dc:description>
                    </entry>
            <entry>
            <title><![CDATA[How to knead dough for perfect buns]]></title>
            <link rel="alternate" href="https://www.nordicbakebox.com.au/blog/baking-tips/how-to-knead-dough-for-perfect-buns" />
            <id>https://www.nordicbakebox.com.au/blog/baking-tips/how-to-knead-dough-for-perfect-buns</id>
            <author>
                <name><![CDATA[Isabelle Melville]]></name>
                                    <email><![CDATA[isabelle@nordicbakebox.com.au]]></email>
                            </author>
            <summary type="html">
                <![CDATA[<p>Kneading dough is a lovely ritual, isn't it?</p>
<p>There's something almost therapeutic about the rhythmic motion. But beyond its calming effect, kneading plays a crucial role in bun making. It's the secret ingredient that gives your dough structure, elasticity, and ultimately, those light and fluffy buns we all crave.</p>
<p> </p>
<p>To knead effectively, let's start with the basics. Using the heel of your hand, push down and out on the dough, stretching it away from you. Next, grab and fold the edge of the dough towards the middle, then press down. Rotate the dough a little with the palm of your hand and repeat the process. Keep this circular motion going for about 10 minutes, until the dough becomes smooth and elastic.</p>
<p> </p>
<p>Consistency is key here. By maintaining a consistent direction while kneading, you prevent breaking the gluten threads that form during the process. And speaking of gluten, how do you know when it's developed enough? Here's a simple test: pinch off a small piece of dough and gently stretch it between your fingers. If you can stretch it out thin without tearing easily, congratulations! Your gluten is developed and ready for baking. If it tears, keep kneading until it stretches smoothly.</p>
<p> </p>
<p>Patience and consistency are your best friends in the kitchen. Enjoy the process, and before you know it, you'll have beautifully kneaded dough ready to be transformed into delicious buns.</p>
<p> </p>
<p>So roll up your sleeves, dust off your countertop, and let's get kneading! Your homemade buns will thank you for it.</p>]]>
            </summary>
                        <category term="Baking tips" />
            <updated>2024-04-20T06:40:48+00:00</updated>
                            <dc:description><![CDATA[Tutorial on how to knead dough for perfect fluffy buns.]]></dc:description>
                    </entry>
            <entry>
            <title><![CDATA[My go to Chocolate mousse recipe - for cake fillings and mousse cakes]]></title>
            <link rel="alternate" href="https://www.nordicbakebox.com.au/blog/recipes/my-go-to-chocolate-mousse-recipe-for-cake-fillings-and-mousse-cakes-2" />
            <id>https://www.nordicbakebox.com.au/blog/recipes/my-go-to-chocolate-mousse-recipe-for-cake-fillings-and-mousse-cakes-2</id>
            <author>
                <name><![CDATA[Isabelle Melville]]></name>
                                    <email><![CDATA[isabelle@nordicbakebox.com.au]]></email>
                            </author>
            <summary type="html">
                <![CDATA[<p><strong>Chocolate Mousse Filling Recipe</strong></p>
<p>This delightful chocolate mousse recipe surpasses buttercream in both taste and simplicity. A former pastry chef in Sweden, I can vouch for its popularity as our go-to cake filling</p>
<p> </p>
<p><em>Ingredients:</em></p>
<ul>
<li>300ml pure cream</li>
<li>150g nice milk chocolate</li>
<li>Pinch of salt (optional)</li>
</ul>
<p><em>Instructions:</em></p>
<ol>
<li>
<p>In a saucepan, heat the pure cream over medium heat on the stove. Be cautious not to let it boil; it should be hot and steamy.</p>
</li>
<li>
<p>Once the cream is hot, but not boiling, remove it from the stove.</p>
</li>
<li>
<p>Add the milk chocolate to the hot cream and stir continuously until the chocolate has completely melted.</p>
</li>
<li>
<p>Pour the chocolate cream into a new bowl and cover it with cling wrap.</p>
</li>
<li>
<p>Place the bowl in the fridge and let it chill for at least 10 hours, preferably 24 hours.</p>
</li>
<li>
<p>After chilling, remove the bowl from the fridge and whip the chocolate cream until it becomes fluffy. Be careful not to over-whip; aim for a creamy and mousse-like consistency.</p>
</li>
<li>
<p>Use the chocolate mousse to fill cakes or serve as a standalone chocolate mousse.</p>
</li>
</ol>
<p><em>Notes:</em></p>
<ul>
<li>For a dark chocolate mousse, use 75g of chocolate.</li>
<li>For a white chocolate mousse, use 180g of chocolate.</li>
<li>Optionally, add a pinch of salt to the cream while heating to enhance the chocolate flavor.</li>
</ul>
<p><em>Cake Filling Tip:</em></p>
<ul>
<li>This quantity is sufficient for one layer in a 21cm diameter cake. For a pure mousse cake, double the amount.</li>
<li>If using it for a mousse cake, fill the cake and let it set in the freezer. Take it out an hour before serving for the perfect consistency.</li>
</ul>]]>
            </summary>
                            <link rel="enclosure" href="https://static.subbly.me/fs/subbly/userFiles/nordic-bakebox/images/a-54-whatsapp-image-2023-11-18-at-173115-17002890989687.jpeg" length="77055" type="image/jpeg" />
                        <category term="Recipes" />
            <updated>2023-11-18T06:26:49+00:00</updated>
                            <dc:description><![CDATA[This delightful chocolate mousse recipe surpasses buttercream in both taste and simplicity. A former pastry chef in Sweden, I can vouch for its popularity as our go-to cake filling]]></dc:description>
                    </entry>
            <entry>
            <title><![CDATA[Pumpkin Shaped Bread Rolls: A Sourdough Discard Delight for Halloween]]></title>
            <link rel="alternate" href="https://www.nordicbakebox.com.au/blog/recipes/pumpkin-shaped-bread-rolls-a-sourdough-discard-delight-for-halloween" />
            <id>https://www.nordicbakebox.com.au/blog/recipes/pumpkin-shaped-bread-rolls-a-sourdough-discard-delight-for-halloween</id>
            <author>
                <name><![CDATA[Isabelle Melville]]></name>
                                    <email><![CDATA[isabelle@nordicbakebox.com.au]]></email>
                            </author>
            <summary type="html">
                <![CDATA[<p> </p>
<p>Looking to add a touch of homemade charm to your Halloween festivities? These Pumpkin Bread Rolls are the perfect way to do it! Not only are they a delicious way to use your sourdough discard, but they're also a fantastic variation on traditional sourdough rolls. These delightful rolls make for a fun addition to lunchboxes or a memorable dinner side for a Halloween-themed meal.</p>
<p> </p>
<h4>Ingredients:</h4>
<p>- Sourdough discard: 150g<br>- Warm water: 600g<br>- Wheat flour: 1000g<br>- Salt: 20g<br>- Instant yeast: 12g<br>- Sugar: 20g<br>- Oil: 50g + some oil for the string</p>
<p>-Cooking string</p>
<p> </p>
<h4>Step-by-Step Instructions:</h4>
<p><strong>1. Mix the Discard, Water, and Flour</strong><br>   In a large mixing bowl, combine the sourdough discard, warm water, and flour. Stir until the ingredients come together to form a dough, which should take approximately 1 minute. Allow the dough to rest and rise for about 30 minutes.</p>
<p><strong>2. Add Yeast, Salt, Sugar, and Oil</strong><br>   After the dough has rested, add the instant yeast, mixing it in thoroughly. Then, incorporate the salt, sugar, and oil. Knead the dough for around 6 minutes until it becomes elastic, silky, and exhibits a nice gluten formation. If you're using a stand mixer, switch to the dough hook attachment for this step.</p>
<p><strong>3. Let the Dough Rise</strong><br>   Allow your dough to rest for approximately an hour, or less if you have a warm kitchen. Your aim is for the dough to double in size during this time.</p>
<p><strong>4. Divide the Dough</strong><br>   Once the dough has doubled in size, gently transfer it to a floured countertop. Divide the dough into 16 even pieces.</p>
<p><strong>5. Shape the Rolls</strong><br>   To shape each roll, follow this technique: Place the dough in the palm of one hand and grab it with the other hand. Begin spinning it clockwise. This method creates tension in the roll and helps give it a nice shape.</p>
<p><strong>6.Turn them in to pumpkins</strong></p>
<p>use 3 or for pieces of string per breadroll. Dip them in oil before using them, as this makes it easier to remove the string after they have been baked. Then place the strings on your kitchen bench  by placing them in top of eachother in a cross. then place a breadroll on top and tigh the end of each strin togheter at the top of the bread roll.</p>
<p><img src="https://static.subbly.me/fs/subbly/userFiles/nordic-bakebox/uploaded-media/pumpkin3-16981084621603.jpg" alt="how to make pumkpin shaped bread rolls" width="417" height="412" data-width="417" data-height="412"></img></p>
<p> </p>
<p>Make sure not to tigh them to tight, as you want to give the bread rolls some space to rise.</p>
<p>Arrange the shaped rolls on two oven trays lined with parchment paper, ensuring they have enough space to expand. Let them rise until they feel nice and springy to the touch, which will take approximately an hour. Keep in mind that this time may be shorter on a warm day.</p>
<p> </p>
<p><img src="https://static.subbly.me/fs/subbly/userFiles/nordic-bakebox/uploaded-media/pumpkin4-16981085362607.jpg" alt="pumpkin bread rolls" width="405" height="397" data-width="405" data-height="397"></img></p>
<p> </p>
<p><strong>7. Bake to Perfection</strong><br>   Preheat your oven to 180°C. Once it reaches the desired temperature, place the trays in the oven. Ensure there's enough room for the rolls to expand as they bake. Your bread rolls will need about 20 minutes in the oven, or until they develop a beautiful golden color. When They have cooled down enough to touch, cut the strings and pull them off.</p>
<p><img src="https://static.subbly.me/fs/subbly/userFiles/nordic-bakebox/uploaded-media/pumpkin2-16981086424645.jpg" alt="baked pumpkin bread rolls" width="585" height="884" data-width="585" data-height="884"></img></p>
<p> </p>
<p> </p>
<p>These Pumpkin Bread Rolls offer a delightful blend of convenience and homemade goodness. Share them with friends and family, or enjoy one with your favorite spreads and toppings. With this recipe in your repertoire, you're on your way to becoming a home baking pro. Happy baking, and have a spooktacular Halloween! \ud83c\udf83\ud83c\udf5e</p>
<p> </p>
<p> </p>
<p> </p>
<p> </p>
<p> </p>
<p> </p>]]>
            </summary>
                            <link rel="enclosure" href="https://static.subbly.me/fs/subbly/userFiles/nordic-bakebox/images/a-51-pumpkin-16981087816725.jpeg" length="82592" type="image/jpeg" />
                        <category term="Recipes" />
            <updated>2023-10-24T00:27:39+00:00</updated>
                            <dc:description><![CDATA[DIY pumpkin shaped bread rolls for halloween. Halloween recipe for Sourdough discard bread rolls shaped as pumpkins. Fun activity for kids and a great thing to have for your dinner party or lunch box.]]></dc:description>
                    </entry>
            <entry>
            <title><![CDATA[Spooky Halloween Ghost Meringues: A Hauntingly Sweet Treat]]></title>
            <link rel="alternate" href="https://www.nordicbakebox.com.au/blog/recipes/spooky-halloween-ghost-meringues-a-hauntingly-sweet-treat-2" />
            <id>https://www.nordicbakebox.com.au/blog/recipes/spooky-halloween-ghost-meringues-a-hauntingly-sweet-treat-2</id>
            <author>
                <name><![CDATA[Isabelle Melville]]></name>
                                    <email><![CDATA[isabelle@nordicbakebox.com.au]]></email>
                            </author>
            <summary type="html">
                <![CDATA[<p>Halloween is just around the corner, and what better way to celebrate than with some delightful, ghostly treats? Our Halloween Ghost Meringues are not only adorable but also scrumptiously sweet. These little meringue spooks are the perfect addition to your Halloween festivities, whether you're throwing a party, looking for a fun project with the kids, or just in the mood for some ghoulishly good sweets.</p>
<p> </p>
<h4>Ingredients:</h4>
<p>- 100 g egg whites (approximately 3 eggs)<br>- 0.5 tbsp lemon juice<br>- 1 dl granulated sugar<br>- 1.5 dl powdered sugar<br>- 50g dark chocolate</p>
<p> </p>
<h4>Instructions:</h4>
<p><strong>1. Preheat the Oven</strong><br>   Start by preheating your oven to 100 degrees Celsius (212 degrees Fahrenheit).</p>
<p><strong>2. Whisk the Egg Whites and Lemon Juice</strong><br>   In a clean and dry bowl, whisk the egg whites and add the lemon juice. When the egg whites begin to foam, gradually add the granulated sugar. Continue whisking until the mixture forms stiff, glossy peaks. You should be able to hold the bowl upside down without the meringue sliding out.</p>
<p><strong>3. Add the Powdered Sugar</strong><br>   Sift the powdered sugar into the meringue mixture and gently fold it in with a spatula. This step will give your meringues that perfect melt-in-your-mouth texture.</p>
<p><strong>4. Pipe or Spoon Ghost Shapes</strong><br>   Using a piping bag or a spoon, create ghost shapes on a baking sheet lined with parchment paper. Make them as spooky or friendly as you like.</p>
<p><strong>5. Bake to Perfection</strong><br>   Pop your little ghostly creations into the preheated oven. Bake for approximately 50-70 minutes, depending on the size of your meringues. They should become crisp and dry on the outside while remaining soft on the inside. </p>
<p><strong>6. Add the Finishing Touches</strong><br>   Once your meringues have cooled, it's time to give them eyes! Melt the dark chocolate, and gently dip each ghost in it. Then use a toothpick or a scewer to create "eyes" by dipping one end in the melted chocolate and then painting it on the ghost. This step is where your ghosts truly come to life.</p>
<p> </p>
<p>Now, you're ready to enjoy these hauntingly delicious Halloween Ghost Meringues. They're perfect for sharing with friends and family, bringing to a Halloween party, or enjoying as a spooktacular treat all to yourself. Serve them at your Halloween party, alongside a warm cup of cocoa, as decoration on a cake or as a fun option for trick-or-treating.</p>
<p>These little ghostly meringues are a fantastic way to embrace the spirit of Halloween. They're not only delicious but also a fun to make with your kids. So, get creative and make your own ghoulishly good meringues this Halloween season!</p>
<p> </p>
<p>What are your favorite Halloween treats? Share your ideas and creations with us in the comments below. Happy Halloween, and may your celebrations be filled with sweet and spooky delights! \ud83c\udf83\ud83d\udc7b</p>]]>
            </summary>
                            <link rel="enclosure" href="https://static.subbly.me/fs/subbly/userFiles/nordic-bakebox/images/a-48-spookyghosts-1698106962882.jpeg" length="126849" type="image/jpeg" />
                        <category term="Recipes" />
            <updated>2023-10-23T23:39:16+00:00</updated>
                            <dc:description><![CDATA[Halloween recipe for spooky ghost treats. Make some fun creations this halloween with our halloween meringue ghosts. Adorable and tasty- A fun activity to do with your kids this halloween.]]></dc:description>
                    </entry>
            <entry>
            <title><![CDATA[Homemade Strawberry Ice Cream Recipe - No Ice Cream Maker Required!]]></title>
            <link rel="alternate" href="https://www.nordicbakebox.com.au/blog/homemade-strawberry-ice-cream-recipe-no-ice-cream-maker-required" />
            <id>https://www.nordicbakebox.com.au/blog/homemade-strawberry-ice-cream-recipe-no-ice-cream-maker-required</id>
            <author>
                <name><![CDATA[Isabelle Melville]]></name>
                                    <email><![CDATA[isabelle@nordicbakebox.com.au]]></email>
                            </author>
            <summary type="html">
                <![CDATA[<p> </p>
<p><em>Indulge in the Sweetness of Summer with Homemade Strawberry Ice Cream - No Ice Cream Maker Required!</em></p>
<p> </p>
<p>Summer is the season of sunshine, lazy days, and, of course, ice cream! There's nothing quite like the cool, creamy goodness of a scoop of homemade ice cream on a warm afternoon. If you're looking for a delightful treat to beat the heat, our Homemade Strawberry Ice Cream is a must-try. Made with fresh ingredients and without any nasty additives, this recipe captures the essence of summer in every spoonful.</p>
<p> </p>
<h2>Ingredients</h2>
<p>Here's what you'll need:</p>
<p>- 700ml - Strawberries<br>- 140g - Granulated sugar<br>- 2 - Egg yolks<br>- 300 ml - Milk<br>- 1 tsp - Vanilla sugar<br>- A pinch of salt<br>- 200 ml - Pure cream</p>
<p> </p>
<h4>Step 1: Create a Strawberry Reduction</h4>
<p>Shop up the  strawberries and place them in a thick-bottomed saucepan along with 90g of sugar. Heat it up and stir until all the sugar has completely dissolved. Once the sugar is dissolved, set the saucepan aside and let this strawberry reduction cool.</p>
<p> </p>
<h4>Step 2: Whisk the Egg Yolks and Sugar</h4>
<p>In a separate bowl, whisk 2 egg yolks with the remaining sugar until the mixture becomes light and frothy. This step adds a lovely richness to our ice cream.</p>
<p> </p>
<h4>Step 4: Heat the Milk</h4>
<p>In a saucepan, heat 300 ml of milk until it's just about to simmer. Then, gradually whisk the egg and sugar mixture in to the milk and keep stirring. Make sure it does not start to boil! This will create a custard-like base for our ice cream.</p>
<p>continue to cook it over low heat while stirring constantly. Be sure not to let it come to a boil; we want it to thicken gradually.</p>
<p> </p>
<h4>Step 5: Cool the Custard</h4>
<p>Remove the saucepan from the heat and let the custard cool slightly. We don't want to melt our strawberry puree when we combine them.</p>
<p> </p>
<h4>Step 6: Whip the cream</h4>
<p>Whip the cream until it reaches a stage where soft peaks begin to form.</p>
<p> </p>
<h4>Step 7: Mix the Ingredients</h4>
<p>Combine the strawberry mix with the custard. Add 1 tsp of vanilla sugar and a pinch of salt for that perfect balance of flavours. Finish it off by gently folding in the cream. The result should be a luscious, pale pink ice cream base.</p>
<p> </p>
<h4>Step 8: Freeze and Enjoy!</h4>
<p>Pour your ice cream mixture into a container and place it in the freezer. Stir the mixture every 30 minutes for the first 3 hours to ensure a creamy texture. Then, let it freeze for several more hours or overnight.</p>
<p> </p>
<h4>Conclusion</h4>
<p>There you have it, your very own batch of Homemade Strawberry Ice Cream without any nasties! With the sweet and tangy flavours of fresh strawberries, this delightful treat is sure to be a hit on hot summer days. So, gather your ingredients, embrace the summer vibes, and create memories with each scoop of this homemade goodness. Enjoy!</p>]]>
            </summary>
                            <link rel="enclosure" href="https://static.subbly.me/fs/subbly/userFiles/nordic-bakebox/images/a-45-screenshot-2025-02-13-115251-17394085778996.png" length="94025" type="image/png" />
                        <category term="Uncategorised" />
            <updated>2023-10-02T23:59:26+00:00</updated>
                            <dc:description><![CDATA[


Indulge in the Sweetness of Summer with a recipe for Homemade Strawberry Ice Cream - No Ice Cream Maker Required!]]></dc:description>
                    </entry>
            <entry>
            <title><![CDATA[Put Your Sourdough Discard To Good Use: Recipe for Bread Rolls]]></title>
            <link rel="alternate" href="https://www.nordicbakebox.com.au/blog/bread/put-your-sourdough-discard-to-good-use-recipe-for-bread-rolls" />
            <id>https://www.nordicbakebox.com.au/blog/bread/put-your-sourdough-discard-to-good-use-recipe-for-bread-rolls</id>
            <author>
                <name><![CDATA[Isabelle Melville]]></name>
                                    <email><![CDATA[isabelle@nordicbakebox.com.au]]></email>
                            </author>
            <summary type="html">
                <![CDATA[<p>Use your sourdough discard to make these beautiful bread rolls, it is a great way to use the discard and a nice varation to the sourdough rolls. The rolls are perfect for brekkie rolls or to make a sandwich for a picninc. The recipe makes 16 large bread rolls.</p>
<p> </p>
<p><strong>Ingredients:</strong></p>
<p class="p1"><span class="s1">discard: 150g</span></p>
<p class="p1"><span class="s1">water 600g</span></p>
<p class="p1"><span class="s1">wheat flour: 1000 g</span></p>
<p class="p1"><span class="s1">salt: 20g</span></p>
<p class="p1"><span class="s1">instant yeast: 12g</span></p>
<p class="p1"><span class="s1">sugar: 20g</span></p>
<p class="p1"><span class="s1">oil: 50g</span></p>
<p class="p1"> </p>
<p><strong>Step-by-Step Instructions:</strong></p>
<p>1. Combine the sourdough discard, warm water, and flour. Mix until the ingredients form a dough, which should take around 1 minute. Allow the dough to rest and rise for 30 minutes.</p>
<p> </p>
<p>2. Add Instant yeast, mix it in then add the salt, sugar and oil to the dough. Knead the dough for about 6 minutes until it becomes elastic, silky and has nice gluten formed. If you're using a stand mixer, use the dough hook attachment.</p>
<p> </p>
<p>3. Let your dough rest for about an hour, shorter if ou have a warm house. Your goal is for the dough to double in size during this time.</p>
<p> </p>
<p>4. Once the dough has doubled, gently transfer it to the countertop and divide the dough in 16 even pieces. Roll each piece to a ball by laying the dough in the palm of one hand grabging the dough with the other hand and spinning it clockwise. This will create a nice tension in the roll. </p>
<p> </p>
<p>6. Place the balls on two oven trays covered with parchement paper. Make sure to give each roll plenty of space. Allow them to rise, until the feel nice and springy to the touch, aproximatly for an hour. Keep in mind that this time will be shorter on a hot day.</p>
<p> </p>
<p>7. Preheat your oven to 180°C. When oven has reached it's temperature, place the trays in the oven. Ensure there's enough space for the rolls to expand as they bakes. Your bread rolls will need about 20 minutes in the oven or until it they have got a golden colour.</p>
<p> </p>
<p>This Sourdough bread roll recipe offers a perfect blend of convenience and homemade charm. Share it with friends and family or simply enjoy a roll with your preferred spreads and toppings. With this recipe in your arsenal, you're well on your way to becoming a home baking pro. Happy baking! </p>]]>
            </summary>
                            <link rel="enclosure" href="https://static.subbly.me/fs/subbly/userFiles/nordic-bakebox/images/a-43-breadroll-16952581415972.jpeg" length="102628" type="image/jpeg" />
                        <category term="Bread" />
            <updated>2023-09-21T01:04:13+00:00</updated>
                            <dc:description><![CDATA[Use your sourdough discard to make these beautiful bread rolls, it is a great way to use the discard and a nice varation to the sourdough rolls. The rolls are perfect for brekkie rolls or to make a sandwich for a picninc. ]]></dc:description>
                    </entry>
            <entry>
            <title><![CDATA[Crafting Your Own Sourdough Discard Sandwich Loaf: Minimising food waste]]></title>
            <link rel="alternate" href="https://www.nordicbakebox.com.au/blog/bread/crafting-your-own-sourdough-discard-sandwich-loaf-minimising-food-waste" />
            <id>https://www.nordicbakebox.com.au/blog/bread/crafting-your-own-sourdough-discard-sandwich-loaf-minimising-food-waste</id>
            <author>
                <name><![CDATA[Isabelle Melville]]></name>
                                    <email><![CDATA[isabelle@nordicbakebox.com.au]]></email>
                            </author>
            <summary type="html">
                <![CDATA[<p>If you're tired of wasting your sourdough discard and are seeking a quicker path to freshly baked goodness, our Sourdough Sandwich Loaf recipe is your gateway to homemade bread that fits your busy schedule. With this recipe, you can enjoy the satisfaction of homemade bread without the extended fermentation time of traditional sourdough. </p>
<p> </p>
<p><strong>Ingredients:</strong></p>
<p class="p1"><span class="s1">discard: 75g</span></p>
<p class="p1"><span class="s1">water 300g</span></p>
<p class="p1"><span class="s1">flour: 475g</span></p>
<p class="p1"><span class="s1">whole wheat flour: 60g</span></p>
<p class="p1"><span class="s1">salt: 10g</span></p>
<p class="p1"><span class="s1">instant yeast: 6g</span></p>
<p class="p1"><span class="s1">sugar: 20g</span></p>
<p class="p1"><span class="s1">butter: 60g</span></p>
<p class="p1"> </p>
<p><strong>Step-by-Step Instructions:</strong></p>
<p>1. In the bowl of your bench mixer, combine the sourdough discard, warm water, and flour. Mix until the ingredients form a dough, which should take around 1 minute. Allow the dough to rest and rise for 30 minutes.</p>
<p> </p>
<p>2. Add Instant yeast, mix it in then add the salt, sugar and softened butter to the bowl. Knead the dough for about 3 to 6 minutes until it becomes elastic, silky and has nice gluten formed. If you're using a stand mixer, use the dough hook attachment.</p>
<p> </p>
<p>3. Let your dough have its moment to rise for about an hour. Thanks to the instant yeast, the dough will rise rapidly, especially in a warm environment. Your goal is for the dough to double in size during this time.</p>
<p> </p>
<p>4. While you wait for the dough's rising, lightly butter a sandwich loaf so that it's ready to hold your bread when it's shaped.</p>
<p> </p>
<p>5. Once the dough has doubled, gently transfer it to the countertop with the smooth side facing down and the sticky side up. Shape it into a neat rectangle by gently stretching it out; the dough's natural elasticity makes this process effortless. To create the classic sandwich loaf shape, fold both sides of the dough towards the middle, then roll it into a tight log with the seam tucked underneath. Enhance the top of the loaf by positioning your hands at its base and gently pulling the dough towards you without lifting it off the countertop.</p>
<p> </p>
<p>6. Place the loaf in the buttered loaf tin. Allow it to rise until it's just above the rim of the tin, which will take approximately an hour, depending on your home's temperature.</p>
<p> </p>
<p>7. It's time to give your bread its golden glory. Preheat your oven to 180°C. Prior to baking, give your dough's top a gentle mist with some water, and then place it into the oven. Ensure there's enough space for the loaf to expand as it bakes. Your bread will need about 40 to 45 minutes in the oven or until it takes on a got a golden colour.</p>
<p> </p>
<p>8. Once your loaf is done, remove it from the tin and let it cool on a wire rack. After it has cooled, slice your homemade sourdough sandwich bread.</p>
<p> </p>
<p>This Sourdough Sandwich Loaf recipe offers a perfect blend of convenience and homemade charm. Share it with friends and family or simply enjoy a slice with your preferred spreads and toppings. With this recipe in your arsenal, you're well on your way to becoming a home baking pro. Happy baking! </p>]]>
            </summary>
                            <link rel="enclosure" href="https://static.subbly.me/fs/subbly/userFiles/nordic-bakebox/images/a-42-whatsapp-image-2023-09-13-at-183222-1-16945943193362.jpeg" length="259770" type="image/jpeg" />
                        <category term="Bread" />
            <updated>2023-09-13T08:17:25+00:00</updated>
                            <dc:description><![CDATA[If you&#039;re tired of wasting your sourdough discard and are seeking a quicker path to freshly baked goodness, our Sourdough Discard Sandwich Loaf recipe is your gateway to homemade bread that fits your busy schedule.]]></dc:description>
                    </entry>
            <entry>
            <title><![CDATA[Crisp and Versatile: The History of the delicious Nordic Thin Breads]]></title>
            <link rel="alternate" href="https://www.nordicbakebox.com.au/blog/crisp-and-versatile-the-history-of-the-delicious-nordic-thin-breads" />
            <id>https://www.nordicbakebox.com.au/blog/crisp-and-versatile-the-history-of-the-delicious-nordic-thin-breads</id>
            <author>
                <name><![CDATA[Isabelle Melville]]></name>
                                    <email><![CDATA[isabelle@nordicbakebox.com.au]]></email>
                            </author>
            <summary type="html">
                <![CDATA[<p>Thin bread, known by various names across the Nordic countries, In Sweden, thin bread is often referred to as "knäckebröd" when it is crisp. However, it is called "tunnbröd" when it is soft, highlighting the versatility of this beloved Nordic staple. It is called "knekkebrød" in Norway, and "ruisleipä" in Finland, has a rich history that stretches back to the Iron Age. These sturdy breads were ingeniously crafted to endure the long and harsh Nordic winters. With limited access to fresh bread during these cold months, the Nordic people needed a way to ensure a reliable food source that could last. Thus, thin bread was born.</p>
<p> </p>
<p>The dough is rolled out thinly and baked to perfection. The thinness and thorough baking process allows the bread to keep for extended periods without spoiling. Over time, the recipe evolved to include variations using other grains like oats or wheat and the addition of seeds and spices for added flavor and texture.</p>
<p> </p>
<p>This traditional bread can be crafted from a diverse range of flours, including barley, rye, wheat, oats, peas, and even bark, often combined in various blends. It can be baked with or without the inclusion of sourdough, yeast, or even potatoes, showcasing the ingenuity of Nordic bakers throughout history. The choice of liquid to bind the dough can also vary depending on the region it is made in, it can be mad with water, milk, or even blood! Each lending its unique character and flavour to the final product.</p>
<p> </p>
<p>To add a delightful twist, anise and fennel are the most common spices used, infusing the bread with their aromatic and flavorful notes. These spices, carefully selected and incorporated into the dough, contribute to the distinct taste that makes Nordic thin bread a cherished part of the region's culinary heritage.</p>
<p> </p>
<h2><span style="font-size: 22px;">Tunnbrödsrulle: A classic Nordic street food</span></h2>
<p>One iconic way to enjoy thin bread in Sweden is through a traditional dish known as "tunnbrödsrulle." This beloved culinary creation consists of a thin bread wrap filled with a delightful combination of ingredients. While the fillings may vary, a classic tunnbrödsrulle typically includes the following components:</p>
<p>1<strong>. Mash Potatoes:</strong> Creamy, buttery mashed potatoes serve as the hearty base of the roll.</p>
<p>2.<strong> Wiener Sausages:</strong> 2 wiener sausages are layered on top of the mashed potatoes.</p>
<p>3. <strong>Sweet Spicy Mustard:</strong> A generous dollop of sweet and spicy Swedish mustard adds a tangy kick to the flavour.</p>
<p>4. <strong>Tomato Sauce:</strong> A touch of tomato sauce enhances the overall richness of the roll.</p>
<p>5. <strong>Roasted Onions:</strong> Crispy fried onions offer a delightful crunch.</p>
<p>It's important to note that there's often a friendly debate among enthusiasts about whether to include a creamy prawn salad in the tunnbrödsrulle or not. This reflects the personal preferences and regional variations in the beloved dish, making it an ever-evolving culinary tradition.</p>
<h2><span style="font-size: 22px;">Versatility for Picnics and Beyond: The "Tortilla Bread of the North"</span></h2>
<p>Beyond the tunnbrödsrulle, thin breads in the Nordics are known for their versatility, especially when it comes to picnics. They are commonly used as wraps, offering a blank canvas for a wide array of fillings. Some even liken them to the "tortilla bread of the North" due to their role as flexible carriers for a variety of ingredients. For instance, you might find thin bread wraps filled with smoked salmon, cream cheese, salad greens, chives, dill, and crisp radishes, a combination that exemplifies the fresh and vibrant flavors of Nordic cuisine.</p>
<p>This practice of using thin breads for picnics and as wrap-style sandwiches showcases their adaptability and convenience, allowing people to enjoy a delicious meal on the go while embracing the flavors of the region.</p>
<p> </p>
<p>In summary, the history of thin breads in the Nordics is deeply rooted in the need for a reliable food source during the harsh winters. These breads, whether soft or crisp, have evolved over centuries, becoming a cherished part of Nordic food culture. Whether enjoyed as traditional tunnbrödsrulle or used as versatile wraps for picnics, thin breads continue to connect people to their culinary heritage and offer a taste of Nordic traditions, old and new.</p>]]>
            </summary>
                            <link rel="enclosure" href="https://static.subbly.me/fs/subbly/userFiles/nordic-bakebox/images/a-40-hardbread-17048914126218.jpeg" length="183950" type="image/jpeg" />
                        <category term="Uncategorised" />
            <updated>2023-09-12T04:11:21+00:00</updated>
                            <dc:description><![CDATA[
3 / 3

Explore Nordic thin bread&#039;s rich history and versatility in our blog. From tradition to modern twists, it&#039;s a culinary journey!]]></dc:description>
                    </entry>
            <entry>
            <title><![CDATA[Gathering and Explaining Key Terms in Sourdough Baking for Newcomers Seeking Clarity]]></title>
            <link rel="alternate" href="https://www.nordicbakebox.com.au/blog/bread/gathering-and-explaining-key-terms-in-sourdough-baking-for-newcomers-seeking-clarity" />
            <id>https://www.nordicbakebox.com.au/blog/bread/gathering-and-explaining-key-terms-in-sourdough-baking-for-newcomers-seeking-clarity</id>
            <author>
                <name><![CDATA[Isabelle Melville]]></name>
                                    <email><![CDATA[isabelle@nordicbakebox.com.au]]></email>
                            </author>
            <summary type="html">
                <![CDATA[<p>Starting your sourdough journey can be confusing and feel overwhelming. With all the steps and routines to learn, along with an array of new terms and words you might not have encountered before, it's natural to feel a bit lost. I remember when I first began baking; it was all so perplexing. Therefore, I thought I would offer assistance by providing concise explanations of the most common terms and words used in sourdough baking.</p>
<p> </p>
<p><strong>Starter.</strong></p>
<p>The heartbeat of sourdough. At the core of sourdough baking lies the "starter." This living ecosystem of wild yeast and bacteria is the heartbeat of your bread-making. Also referred to as "levain" or "mother," the starter is nurtured and fed, fostering the growth of microbes that impart that signature tangy flavor and impressive rise to your loaves.</p>
<p> </p>
<p><strong>Autolyse.</strong></p>
<p>Where flour meets water. Autolyse, a term borrowed from the french, involves the simple yet transformative act of combining flour and water before the addition of salt or yeast. This resting period allows enzymes in the flour to break down complex carbohydrates, fostering gluten development and yielding a dough with improved extensibility and structure.</p>
<p> </p>
<p><strong>Stretch and Fold.</strong></p>
<p><strong>Gentle Art of Strengthening. </strong>The "stretch and fold" is a technique that simulates kneading without excessive manipulation. This process enhances gluten development and redistributes the yeast and bacteria for more even fermentation. With each fold, the dough becomes more elastic and responsive, gradually turning into a supple, workable canvas.</p>
<p> </p>
<p><strong>Bulk Fermentation.</strong></p>
<p>Where the magic happen. Once your dough is mixed and has ben strengthen through folding. Allow the dough to rest and ferment over several hours permits the wild yeast and bacteria to work their magic, developing flavor, texture, and that sought-after airy crumb structure.</p>
<p> </p>
<p><strong>Pre-shaping and Final Shape.</strong></p>
<p>It is when you are sculpting your vision. The journey towards a perfect loaf continues with "pre-shaping" and "final shaping." During pre-shaping, you gently coax the dough into a loose round or rectangular form. This step helps create a better gluten structure, making it more manageable for the final shaping. In the final shaping, you refine your dough's structure and surface tension, creating a tight, neat package. Each movement is purposeful, as you guide the dough to hold its shape during the final rise and baking. The grace with which you handle the dough at this stage influences the outcome, its important to be careful here to not flatten or press out air that has formed in the dough. As it will affect both the crumb structure to the crust's texture.</p>
<p> </p>
<p><strong>Proofing.</strong></p>
<p>A time to be patient. Enter the world of "proofing," where time takes on a role as crucial as any ingredient. During this phase, your shaped dough undergoes a final rise, allowing it to fully develop its flavors and textures. The proofing process can take place in various environments, such as baskets, bowls, or on baking sheets, each lending their unique touch to the loaf's appearance.</p>
<p> </p>
<p><strong>Banneton.</strong></p>
<p>The dough's cozy bed. As your dough gains strength and character, it's time to nestle it in a "banneton," a round or oval proofing basket. The banneton supports the dough's shape during its final rise, allowing it to retain the beautiful pattern from the basket's interior texture.</p>
<p> </p>
<p><strong>Scoring.</strong></p>
<p>Artistry on the Surface. The surface of your sourdough loaf is an artist's canvas waiting to be scored. Scoring involves making deliberate cuts on the dough's surface before baking. This not only creates a stunning visual effect but also serves a functional purpose by allowing the dough to expand gracefully during baking.</p>
<p> </p>
<p><strong>Oven Spring.</strong></p>
<p>Rise to glory. As your scored dough enters the oven, the magic intensifies during the "oven spring" phase. The heat triggers a burst of expansion as trapped gases rapidly expand, causing the dough to rise dramatically. This is where all your patient nurturing culminates in a glorious bloom.</p>
<p> </p>
<p><img src="https://static.subbly.me/fs/subbly/userFiles/nordic-bakebox/uploaded-media/sourdoughearpng-copy-16927414200417.jpg" alt="sourdough bread" width="485" height="364" data-width="461" data-height="346"></img></p>
<p><strong>The Ear.</strong></p>
<p>A mark of mastery. A pinnacle of sourdough artistry, the "ear" is the distinct crispy flap that forms at the edge of a well-scored loaf during baking. An "ear" is born from a perfectly executed score, allowing the dough's expansion to occur in a controlled manner. It's a mark of a skilled baker, an indication that the fermentation, shaping, and scoring harmonized beautifully.</p>
<p> </p>
<p><strong>Crumb.</strong></p>
<p>Beyond the crust. While the crust tantalizes with its deep color and satisfying crunch, the "crumb" is where the story continues within. The crumb encompasses the interior texture, characterized by its open, irregular air pockets, a testament to your skillful fermentation, handling, and baking.</p>
<p>Sourdough baking is a marriage of time-honored techniques and a deep connection to nature's microcosms. Understanding the intricate verbage surrounding this ancient craft enhances your ability to orchestrate a symphony of flavors, textures, and aromas. As you journey through the labyrinth of sourdough terminology, you'll not only bake bread but create edible poetry—a feast for both the senses and the soul.</p>
<p> </p>
<p> </p>]]>
            </summary>
                            <link rel="enclosure" href="https://static.subbly.me/fs/subbly/userFiles/nordic-bakebox/images/a-39-sourdoughheader-16927420616581.jpeg" length="88344" type="image/jpeg" />
                        <category term="Bread" />
            <updated>2023-08-22T22:08:05+00:00</updated>
                            <dc:description><![CDATA[A quick guide to sourdough baking terminology, from starters to shaping techniques, pre-shaping, final shaping, proofing, and more.  Develop your sourdough knowledge with this guide.]]></dc:description>
                    </entry>
            <entry>
            <title><![CDATA[Homemade Burger Bun Recipe - Elevate Your Burger Game!]]></title>
            <link rel="alternate" href="https://www.nordicbakebox.com.au/blog/homemade-burger-bun-recipe-elevate-your-burger-game-1" />
            <id>https://www.nordicbakebox.com.au/blog/homemade-burger-bun-recipe-elevate-your-burger-game-1</id>
            <author>
                <name><![CDATA[Isabelle Melville]]></name>
                                    <email><![CDATA[isabelle@nordicbakebox.com.au]]></email>
                            </author>
            <summary type="html">
                <![CDATA[<p> </p>
<p>When it comes to crafting the perfect burger, the spotlight often falls on the patty and toppings. But let's not forget about the unsung hero that holds it all together - the burger bun! The store-bought buns might do the job, but if you're ready to take your burger experience to the next level, why not try making your own homemade burger buns? Fresh, fluffy, and full of flavor, these buns will elevate your burger game to new heights. In this blog post, we'll guide you through a delightful burger bun recipe that will have your taste buds dancing.</p>
<p> </p>
<h3>Ingredients:</h3>
<p>- 1 cup lukewarm milk (37°C)<br>- 2 tsp dry yeast<br>- 1 tsp of honey<br>- 1/4 cup unsalted butter, melted<br>- 1 tsp salt<br>- 3 1/2 cups organic wheat flour<br>- 1 egg (mixed with a dash of water and pinch of salt)<br>- Sesame seeds (optional, for topping)</p>
<p> </p>
<h3>Instructions:</h3>
<p> </p>
<p><strong>1. Activate the Yeast:</strong><br>In a bowl, combine warm milk and sugar. Sprinkle the active dry yeast over the mixture and let it sit for about 5-10 minutes until it becomes frothy. This indicates that the yeast is active.</p>
<p> </p>
<p><strong>2. Mix the Dough:</strong><br>Add melted butter and salt to the yeast mixture. Gradually add the flour, one cup at a time, mixing well after each addition. Once the dough comes together, turn it out onto a floured surface and knead for about 5 minutes until it's smooth and elastic.</p>
<p> </p>
<p><strong>3. First Rise:</strong><br>Place the dough in a greased bowl, cover it with a damp cloth, and let it rise in a warm, draft-free place for about 1 to 1.5 hours, or until it has doubled in size.</p>
<p> </p>
<p><strong>4. Shape the Buns:</strong></p>
<p>Punch down the risen dough to release the air. Divide the dough into equal portions, shaping each into a smooth ball. Place the balls on a baking sheet lined with parchment paper, leaving some space between them. Gently flatten each ball to form a bun shape.</p>
<p> </p>
<p><strong>5. Second Rise:</strong><br>Cover the buns with a damp cloth and let them rise for another 30-45 minutes until they've puffed up.</p>
<p> </p>
<p><strong>6. Preheat and Egg Wash:</strong><br>Preheat your oven to 375°F (190°C). Brush the buns with the beaten egg, giving them a beautiful golden finish. If desired, sprinkle sesame seeds on top for added texture and flavor.</p>
<p> </p>
<p><strong>7. Bake to Perfection:</strong><br>Bake the buns in the preheated oven for about 12-15 minutes or until they are golden brown on top. You'll be greeted with a tempting aroma as they bake!</p>
<p> </p>
<p><strong>8. Enjoy:</strong><br>Once baked, let the buns cool on a wire rack. Once they're at room temperature, slice them horizontally and get ready to assemble the most incredible homemade burgers you've ever had.</p>
<p> </p>
<h3>Conclusion:</h3>
<p>Making your own burger buns might take a bit more effort than picking up a bag from the store, but the reward is truly worth it. The satisfaction of sinking your teeth into a juicy burger enveloped in a fresh, homemade bun is unparalleled. Plus, you have the freedom to customize your buns with various toppings and even experiment with different types of flour for unique flavors.</p>
<p>So, the next time you plan a burger night, consider giving this homemade burger bun recipe a try. Your taste buds and your dinner guests will thank you!</p>]]>
            </summary>
                            <link rel="enclosure" href="https://static.subbly.me/fs/subbly/userFiles/nordic-bakebox/images/a-35-hamburgerbuns-16927445469021.png" length="304024" type="image/png" />
                        <category term="Uncategorised" />
            <updated>2023-08-07T03:31:04+00:00</updated>
                            <dc:description><![CDATA[Discover the Ultimate Homemade Burger Bun Recipe. Unleash your culinary creativity and treat your taste buds to a sensational journey of taste and texture. Explore the art of baking and revolutionize your burger nights today.]]></dc:description>
                    </entry>
            <entry>
            <title><![CDATA[Delicious Almond Buns: A Scrumptious Twist on Australia&#039;s Favorite Pastry!]]></title>
            <link rel="alternate" href="https://www.nordicbakebox.com.au/blog/delicious-almond-buns-a-scrumptious-twist-on-australias-favorite-pastry" />
            <id>https://www.nordicbakebox.com.au/blog/delicious-almond-buns-a-scrumptious-twist-on-australias-favorite-pastry</id>
            <author>
                <name><![CDATA[Isabelle Melville]]></name>
                                    <email><![CDATA[isabelle@nordicbakebox.com.au]]></email>
                            </author>
            <summary type="html">
                <![CDATA[<p>One of the absolute best pastries in Australia is the almond croissant.</p>
<p>It's just delicious and seems to be a must at any good cafe here. In Sweden they have a bun version of the almond croissant, an almond bun or a "tosca" bun. It is a bun filled with almond paste and decorated with a sweet mix of chopped almonds or other nuts.</p>
<p>To make these delicious buns, you can use our cinnamon bun base but change the filling.</p>
<p> </p>
<h3><span style="font-size: 18px; font-family: Raleway;"><strong>Ingredients:</strong></span></h3>
<p><strong>Filling:</strong></p>
<ul>
<li><span style="font-family: Raleway;"> 150g icing sugar </span></li>
<li><span style="font-family: Raleway;">150g almond flour</span></li>
<li><span style="font-family: Raleway;"> 3 tbsp water</span></li>
<li><span style="font-family: Raleway;"> 100g butter</span></li>
<li><span style="font-family: Raleway;"> 1 tbsp vanillin sugar or vanilla extract</span></li>
</ul>
<p><strong>Topping: </strong></p>
<ul>
<li><span style="font-family: Raleway;">100g chopped nuts </span></li>
<li><span style="font-family: Raleway;">75g butter </span></li>
<li><span style="font-family: Raleway;">75ml sugar </span></li>
<li><span style="font-family: Raleway;">1½ tbsp flour </span></li>
<li><span style="font-family: Raleway;">1½ tbsp milk</span></li>
</ul>
<p> </p>
<h3><span style="font-size: 18px; font-family: Raleway;"><strong>Instructions:</strong></span></h3>
<p><strong>Step 1:</strong></p>
<p>Start by making the bun dough by following the recipe and instructions provided in our cinnamon bun kit. Instead of making the cinnamon filling, make the almond filling.</p>
<p> </p>
<p><strong>Step 2: </strong></p>
<p>Almond filling: Mix the almond paste with the butter, a little at a time, until you have a smooth filling. Mix in water and vanilla sugar. Spread an even layer of the filling on the rolled-out wheat dough and roll up into a roll. Divide the roll into 24 pieces and place on baking sheets.</p>
<p>Cover with a tea towel and let rest for 1-2 hours.</p>
<p> </p>
<p><strong>Step 3: </strong></p>
<p>Set the oven to 220 degrees Celsius. Topping: Mix all the ingredients, except nuts, in a saucepan. Bring to a boil while stirring over low heat, then turn off the heat and add the nuts.</p>
<p> </p>
<p><strong>Step 4: </strong></p>
<p>Spread the topping on the buns when they have risen and bake in the middle of the oven for 11-13 minutes or until the topping and the bun have a nice color. Take out and let cool.</p>
<p> </p>
<p>Enjoy your delicious almond buns!</p>]]>
            </summary>
                            <link rel="enclosure" href="https://static.subbly.me/fs/subbly/userFiles/nordic-bakebox/images/a-31-whatsapp-image-2023-07-18-at-181948-16896687086768.jpeg" length="648212" type="image/jpeg" />
                        <category term="Uncategorised" />
            <updated>2023-07-18T03:50:01+00:00</updated>
                            <dc:description><![CDATA[Discover the delightful world of almond buns! Learn how to make the perfect almond-filled buns, also known as &quot;tosca&quot; buns, with our easy-to-follow recipe. Elevate your baking skills and enjoy the rich flavors of almond paste and a sweet mix of chopped nuts. Perfect for any occasion, these buns will leave you craving for more!]]></dc:description>
                    </entry>
            <entry>
            <title><![CDATA[Recipe for a traditional Nordic summer strawberry cake]]></title>
            <link rel="alternate" href="https://www.nordicbakebox.com.au/blog/recipes/recipe-for-a-traditional-nordic-summer-strawberry-cake" />
            <id>https://www.nordicbakebox.com.au/blog/recipes/recipe-for-a-traditional-nordic-summer-strawberry-cake</id>
            <author>
                <name><![CDATA[Isabelle Melville]]></name>
                                    <email><![CDATA[isabelle@nordicbakebox.com.au]]></email>
                            </author>
            <summary type="html">
                <![CDATA[<p><span style="font-size: 14px;">Indulge in the luscious delight of a homemade Swedish Strawberry Cake. This step-by-step guide will take you on a culinary journey to create a mouthwatering dessert that perfectly captures the essence of Nordic summer. Get ready to impress your taste buds and wow your loved ones with this irresistible treat.</span></p>
<p> </p>
<p><span style="font-size: 14px;"><img src="https://static.subbly.me/fs/subbly/userFiles/nordic-bakebox/uploaded-media/img0479-copy-16881973502983.png" alt="Strawberry cake" width="449" height="390" data-width="449" data-height="390"></img></span></p>
<p> </p>
<p> </p>
<p><span style="font-size: 14px;"><img src="https://static.subbly.me/fs/subbly/userFiles/nordic-bakebox/uploaded-media/img0493-copy-16881966769151.png" alt="Sliced strawberry cake" width="448" height="485" data-width="448" data-height="485"></img></span></p>
<p> </p>
<p><strong><span style="font-size: 14px;">Ingredients:</span></strong></p>
<p><span style="font-size: 14px;">(Enough for a round cake pan 20cm wide)<br>4 egg<br>200 ml sugar<br>100 ml corn flour<br>100 ml all purpose flour<br>1.5 tsp baking powder</span></p>
<p> </p>
<p>Custard:</p>
<p><span class="Y2IQFc" lang="en" style="font-family: Raleway;">120 ml milk</span></p>
<p><span class="Y2IQFc" lang="en" style="font-family: Raleway;">1/4 tsp vanilla powder [or 1/2 vanilla pod]</span></p>
<p><span class="Y2IQFc" lang="en" style="font-family: Raleway;">40 ml sugar</span></p>
<p><span class="Y2IQFc" lang="en" style="font-family: Raleway;">2 egg yolks </span></p>
<p><span class="Y2IQFc" lang="en" style="font-family: Raleway;">30 ml cornstarch</span></p>
<p><span class="Y2IQFc" lang="en" style="font-family: Raleway;">25 g room temp butter</span></p>
<p> </p>
<p>Strawberry compote:</p>
<p>250g frozen strawberries</p>
<p>1/4 cup of sugar</p>
<p> </p>
<p><span style="font-size: 14px;">1 packet of fresh strawberries</span></p>
<p>600ml of cream</p>
<p> </p>
<p><span style="font-size: 14px;">Filling:</span></p>
<p><span style="font-size: 14px;">Custard +</span></p>
<p><span style="font-size: 14px;">cream</span></p>
<p><span style="font-size: 14px;">strawberry compote</span></p>
<p> </p>
<p><strong><span style="font-size: 14px;">Preparing the custard:</span></strong></p>
<p>In a saucepan, combine vanilla powder and milk, bringing it to a gentle boil. Alternatively, if using a vanilla pod, split it lengthwise, scrape out the seeds, and add both the pod and seeds to the milk in the saucepan. Bring the mixture to a boil and then remove from heat.</p>
<p>Using an electric whisk, beat caster sugar, egg yolks, and cornstarch until well combined. Slowly pour this mixture into the hot milk while continuously stirring.</p>
<p> </p>
<p>Return the saucepan to low to medium heat, stirring the mixture gently. Allow the cream to thicken gradually while stirring. Once thickened, remove the saucepan from heat and stir in the butter.</p>
<p>Transfer the cream to a chilled bowl and place it in the refrigerator. Stir occasionally to prevent a skin from forming until the cream is completely cooled and ready to use, then you can put it in the fridge.</p>
<p> </p>
<p><strong><span style="font-size: 14px;">Preparing the strawberries:</span></strong></p>
<p><span style="font-size: 14px;">Wash the strawberries thoroughly, remove the stems, and pat them dry. Slice a portion of the strawberries to be used as a topping for the cake. Set them aside and reserve the rest for the filling.</span></p>
<p> </p>
<p><strong><span style="font-size: 14px;">Preparing the strawberry compote:</span></strong></p>
<p><span style="font-size: 14px;">In a pot heat up the frozen strawberries and the sugar.  When it starts bubbling, bring down to a simmer and let it simmer for 5 min, before turning of the stove.</span></p>
<p> </p>
<p><strong><span style="font-size: 14px;">Making the cake batter:</span></strong></p>
<p><span style="font-size: 14px;">Preheat oven to 175c. <span style="font-size: 14px;">Grease and line the bottom and sides of your round </span></span><span style="font-size: 14px;"><span style="font-size: 14px;">cake pan with parchment paper.</span></span></p>
<p><span style="font-size: 14px;">In a mixing bowl whip sugar and eggs together until white and fluffy. Gradually sift in the flour, baking powder, gently folding them into the mixture. </span><span style="font-size: 14px;">Place the pan in the lower part of the oven and bake for 45 min or until the cakes are golden brown and a toothpick inserted into the center comes out clean.</span></p>
<p> </p>
<p><strong><span style="font-size: 14px;">Assemble the Cake:</span></strong></p>
<p><span style="font-size: 14px;">Once the cake have cooled completely, it's time to assemble your masterpiece. Start by whipping 1/3 of the cream until it forms stiff peaks. then mix the whipped cream with the cooled custard. </span></p>
<p> </p>
<p><span style="font-size: 14px;">Take take and cut it in to three layers. </span><span style="font-size: 14px;">Place one cake layer on a serving plate and spread a generous amount of the strawberry compote on top. Carefully position the second cake layer over the filling. Then put the custard cream on and spread it out to a nice layer. Then put on your third layer of the cake.</span></p>
<p> </p>
<p><span style="font-size: 14px;">Now, it's time to adorn the cake with whipped cream. Whip the rest of the cream and put 1/2 of it in a piping bag. Spread the rest in a layer over the top and sides of the cake, creating a smooth and creamy exterior. Then take your piping bag and pipe a nice pattern around the cake, but leave the middle empty for the strawberries. </span></p>
<p> </p>
<p><span style="font-size: 14px;">Arrange the sliced strawberries on top of the cake, pressing them gently into the whipped cream. You can get creative with the design or simply create a beautiful pattern with the strawberries. The vibrant red strawberries against the fluffy white cream make for an enticing visual presentation.</span></p>
<p><span style="font-size: 14px;">Your Nordic Strawberry Cake is now ready to be served. Enjoy! </span></p>
<p> </p>
<p> </p>
<p> </p>
<p> </p>
<p> </p>
<p> </p>]]>
            </summary>
                            <link rel="enclosure" href="https://static.subbly.me/fs/subbly/userFiles/nordic-bakebox/images/a-29-img0478-copy-16881971646562.png" length="937036" type="image/png" />
                        <category term="Recipes" />
            <updated>2023-07-01T08:13:50+00:00</updated>
                            <dc:description><![CDATA[Learn how to make a Swedish Strawberry Cake with this step-by-step guide. Indulge in the flavors of summer as you create a moist cake layered with fresh strawberries and topped with creamy whipped cream.]]></dc:description>
                    </entry>
            <entry>
            <title><![CDATA[A recipe for super tasty Sourdough Raisin Toast]]></title>
            <link rel="alternate" href="https://www.nordicbakebox.com.au/blog/bread/a-recipe-for-super-tasty-sourdough-raisin-toast" />
            <id>https://www.nordicbakebox.com.au/blog/bread/a-recipe-for-super-tasty-sourdough-raisin-toast</id>
            <author>
                <name><![CDATA[Isabelle Melville]]></name>
                                    <email><![CDATA[isabelle@nordicbakebox.com.au]]></email>
                            </author>
            <summary type="html">
                <![CDATA[<p>Sourdough Raisin Toast is a delightful twist on traditional toast, combining the tangy flavors of sourdough bread with the natural sweetness raisins. This artisanal treat offers a unique and satisfying breakfast or snack experience.</p>
<p> </p>
<p>The fermentation process adds depth and character, resulting in a bread with a slightly tangy taste and a wonderfully chewy texture. The addition of raisins takes this bread to another level. Whether enjoyed plain or lightly toasted, sourdough raisin toast is a versatile treat that can be savored on its own, with some butter, or topped with some nice cheese. It pairs exceptionally well with a cup of freshly brewed coffee or a steaming mug of tea, making it an ideal choice to start your day or indulge in a cozy afternoon break.</p>
<p> </p>
<p><img src="https://static.subbly.me/fs/subbly/userFiles/nordic-bakebox/uploaded-media/whatsapp-image-2023-07-01-at-170304-16881958601006.jpg" alt="Sourodough raisin toast" width="595" height="466" data-width="676" data-height="529"></img></p>
<p class="wprm-recipe-header wprm-recipe-ingredients-header wprm-block-text-uppercase wprm-align-left wprm-header-decoration-line wprm-header-has-actions wprm-header-has-actions"> </p>
<p class="wprm-recipe-header wprm-recipe-ingredients-header wprm-block-text-uppercase wprm-align-left wprm-header-decoration-line wprm-header-has-actions wprm-header-has-actions"><span style="font-family: Raleway;">INGREDIENTS</span></p>
<ul class="wprm-recipe-ingredients">
<li class="wprm-recipe-ingredient">
<p><span style="font-family: Raleway;"><span class="wprm-recipe-ingredient-amount">500</span> <span class="wprm-recipe-ingredient-unit">g</span> <span class="wprm-recipe-ingredient-name">Bread Flour</span></span></p>
</li>
<li class="wprm-recipe-ingredient">
<p><span style="font-family: Raleway;"><span class="wprm-recipe-ingredient-amount">350</span> <span class="wprm-recipe-ingredient-unit">g</span> <span class="wprm-recipe-ingredient-name">Water</span></span></p>
</li>
<li class="wprm-recipe-ingredient">
<p><span style="font-family: Raleway;"><span class="wprm-recipe-ingredient-amount">100</span> <span class="wprm-recipe-ingredient-unit">g</span> fed s<span class="wprm-recipe-ingredient-name">ourdough Starter</span></span></p>
</li>
<li class="wprm-recipe-ingredient">
<p><span style="font-family: Raleway;"><span class="wprm-recipe-ingredient-amount">10</span> <span class="wprm-recipe-ingredient-unit">g</span> <span class="wprm-recipe-ingredient-name">Salt</span></span></p>
</li>
<li class="wprm-recipe-ingredient">
<p><span style="font-family: Raleway;"><span class="wprm-recipe-ingredient-amount">30</span> <span class="wprm-recipe-ingredient-unit">g</span> <span class="wprm-recipe-ingredient-name">Honey</span></span></p>
</li>
<li class="wprm-recipe-ingredient">
<p><span style="font-family: Raleway;"><span class="wprm-recipe-ingredient-amount">100</span> <span class="wprm-recipe-ingredient-unit">g raisins</span></span></p>
</li>
<li class="wprm-recipe-ingredient"> </li>
</ul>
<p class="wprm-recipe-group-name wprm-recipe-ingredient-group-name wprm-block-text-faded"><span style="font-family: Raleway;">Cinnamon Filling</span></p>
<ul class="wprm-recipe-ingredients">
<li class="wprm-recipe-ingredient">
<p><span style="font-family: Raleway;"><span class="wprm-recipe-ingredient-amount">40</span> <span class="wprm-recipe-ingredient-unit">g</span> <span class="wprm-recipe-ingredient-name">Butter</span></span></p>
</li>
<li class="wprm-recipe-ingredient">
<p><span style="font-family: Raleway;"><span class="wprm-recipe-ingredient-amount">10</span> <span class="wprm-recipe-ingredient-unit">g</span> <span class="wprm-recipe-ingredient-name">Cinnamon</span></span></p>
</li>
<li class="wprm-recipe-ingredient">
<p><span style="font-family: Raleway;"><span class="wprm-recipe-ingredient-amount">20</span> <span class="wprm-recipe-ingredient-unit">g</span> flour</span></p>
</li>
</ul>
<p> </p>
<p>BAKING SCHEDULE</p>
<p>Day 1: 9:00 PM: Feed your sourdough starter.</p>
<p>Day 2: 9:00 AM: Mix the water and honey first, until fully incorporated. Then mix in the sourdough starter and stirr until completly disolved. Then add the flour and mix for 2 minutes. Add the salt and work the dough for another 2 minutes. Then cover, and let it rest for one hour. Meanwhile soak the raisins in some warm water.</p>
<p>10:00 AM: Perform one set of stretches and folds. Cover and let the dough rest for 30 minutes.</p>
<p>10:30 AM: Drain the raisins and incorporate them into the dough when doing streches and folds. Cover the dough and let it rest at room temperature until it has doubled in size. Take butter out of the fridge to soften at room temperature.</p>
<p>15:00 PM: Mix the butter with the cinnamon for the filling. Spread it onto the dough, shape the dough put it in a banneton or a bowl coverd with a teatowel. Put it in the fridge and let it cold ferment over night.</p>
<p>Day 3: 7:00 AM: Take out the bread of the fridge and bake it. Enjoy!</p>
<p> </p>
<p><img src="https://static.subbly.me/fs/subbly/userFiles/nordic-bakebox/uploaded-media/whatsapp-image-2023-07-01-at-164338-16881959317108.jpg" alt="sourdough in pot" width="389" height="519" data-width="525" data-height="700"></img></p>
<p> </p>
<p> </p>
<p> </p>
<p> </p>
<p> </p>
<p> </p>
<p> </p>
<p> </p>
<p> </p>
<p> </p>
<p> </p>
<p> </p>
<p> </p>
<p> </p>
<p> </p>]]>
            </summary>
                            <link rel="enclosure" href="https://static.subbly.me/fs/subbly/userFiles/nordic-bakebox/images/a-30-whatsapp-image-2023-07-01-at-164248-16881961351179.jpeg" length="208475" type="image/jpeg" />
                        <category term="Bread" />
            <updated>2023-07-01T07:23:25+00:00</updated>
                            <dc:description><![CDATA[Discover the irresistible charm of sourdough raisin toast - a delectable blend of tangy sourdough bread and sweet plump raisins. Delve into the flavors, textures, and sheer joy of this artisanal treat. Perfect for breakfast or a cozy snack, our blog explores the unique pairing, versatile accompaniments, and the art of savoring every bite. Elevate your culinary adventures with this heavenly delight and indulge in the harmonious symphony of flavors. Join us on a journey of culinary bliss with sourdough raisin toast.]]></dc:description>
                    </entry>
            <entry>
            <title><![CDATA[Swedish Midsummer: Exploring Traditions, Festivities, and Culinary Delights]]></title>
            <link rel="alternate" href="https://www.nordicbakebox.com.au/blog/swedish-midsummer-exploring-traditions-festivities-and-culinary-delights" />
            <id>https://www.nordicbakebox.com.au/blog/swedish-midsummer-exploring-traditions-festivities-and-culinary-delights</id>
            <author>
                <name><![CDATA[Isabelle Melville]]></name>
                                    <email><![CDATA[isabelle@nordicbakebox.com.au]]></email>
                            </author>
            <summary type="html">
                <![CDATA[<p><strong>1. The Significance of Swedish Midsummer:</strong></p>
<p>Swedish Midsummer takes place on the longest day of the year, marking the summer solstice. This astronomical event holds cultural and historical significance for Swedes, symbolizing the triumph of light over darkness. As the sun graces the Scandinavian sky, Swedes embrace the opportunity to celebrate the abundance of nature, unity, and the joys of summer.</p>
<p><strong>2. Traditional Customs and Festivities:</strong></p>
<p>Swedish Midsummer is rich with customs and festivities that have been cherished for centuries. One iconic tradition is the maypole, or "midsommarstång," covered with leaves and flowers. Friends and family gather around the maypole, engaging in lively dances such as the "små grodorna" (the little frogs) dance, where participants imitate hopping frogs. </p>
<p><strong>3. Delightful Culinary Delights:</strong></p>
<p>No celebration is complete without culinary delights. Traditional dishes include pickled herring, served in various flavorful preparations, and freshly harvested potatoes. Salmon, grilled meats, meatballs, and an assortment of salads also grace the Midsummer table. The crowning glory is always an irresistible strawberry cake, garnished with luscious whipped cream and heaps of strawberries, symbolizing the arrival of summer's sweetest bounty.</p>
<p><strong>4. Connecting with Nature:</strong></p>
<p>Swedish Midsummer provides an opportunity to immerse oneself in the tranquility of nature. Swedes often retreat to the countryside, where they partake in outdoor activities. Many also engage in traditional games like kubb, a Viking-inspired throwing game that adds an element of friendly competition to the festivities.</p>
<p><strong>Conclusion:</strong></p>
<p>Swedish Midsummer is a captivating blend of tradition, merriment, and love for nature. This cherished celebration allows Swedes to embrace the magic of the summer solstice and rejoice in the company of loved ones. From the funny maypole dances to savoring mouthwatering delicacies, every aspect of Swedish Midsummer reflects the joy and vitality of the season. I hope you liked learning about the midsummer tradition. Skål!</p>]]>
            </summary>
                            <link rel="enclosure" href="https://static.subbly.me/fs/subbly/userFiles/nordic-bakebox/images/a-28-midsummer-16874948883774.png" length="953200" type="image/png" />
                        <category term="Uncategorised" />
            <updated>2023-06-23T04:15:06+00:00</updated>
                            <dc:description><![CDATA[Experience the enchantment of Swedish Midsummer, a captivating summer solstice celebration. Discover ancient traditions, lively festivities, and delectable culinary delights. Immerse yourself in the customs and dances around the maypole, savor traditional dishes like marinated herring and grilled sausages, and indulge in the iconic strawberry cake. Connect with nature through leisurely walks and outdoor activities. Explore the significance of Swedish Midsummer and create unforgettable memories. Join us on this cultural journey and embrace the magic of Swedish Midsummer.]]></dc:description>
                    </entry>
            <entry>
            <title><![CDATA[What is Swedish Fika and Danish Hygge?]]></title>
            <link rel="alternate" href="https://www.nordicbakebox.com.au/blog/what-is-swedish-fika-and-danish-hygge" />
            <id>https://www.nordicbakebox.com.au/blog/what-is-swedish-fika-and-danish-hygge</id>
            <author>
                <name><![CDATA[Isabelle Melville]]></name>
                                    <email><![CDATA[isabelle@nordicbakebox.com.au]]></email>
                            </author>
            <summary type="html">
                <![CDATA[<h4><span style="font-family: Raleway; font-weight: 400;">Swedish Fika: </span></h4>
<p><span style="font-family: Raleway; font-weight: 400;">Fika is more than just a coffee break; it's a cherished Swedish tradition that encourages taking time out of the day to enjoy a warm beverage, paired with a delicious treat. It is a social ritual, often shared with friends, family, or colleagues. The simplicity of Fika lies in its focus on being fully present and indulging in the moment. From cinnamon buns to cardamom-spiced cookies, Fika treats are an essential part of Swedish culture, offering a delightful respite from the hustle and bustle of daily life.</span></p>
<p> </p>
<h4><span style="font-family: Raleway; font-weight: 400;">Danish Hygge: </span></h4>
<p><span style="font-family: Raleway; font-weight: 400;">Denmark's concept of Hygge embodies coziness, contentment, and creating a warm atmosphere. It's about finding joy in life's simple pleasures and nurturing a sense of comfort and togetherness. Hygge can be experienced through various activities like curling up with a good book, enjoying candlelight, or sharing a hearty meal with loved ones. In the heart of Hygge, there's an emphasis on cultivating an inviting space, fostering connection, and appreciating the present moment.</span></p>
<p><span style="font-family: Raleway; font-weight: 400;">Finding Balance and Meaning: Both Fika and Hygge offer opportunities for self-care, mindfulness, and connection. They remind us to slow down, appreciate the small things, and prioritize self-reflection. Engaging in these practices can create a sense of balance in our fast-paced lives and help us find meaning in the everyday.</span></p>
<p><span style="font-family: Raleway; font-weight: 400;">Bringing Fika and Hygge into Your Life: Incorporating Fika and Hygge into our routines is easier than we might think. Here are a few simple ways to embrace these traditions:</span></p>
<ol>
<li><span style="font-family: Raleway; font-weight: 400;">Create cozy corners in your home with soft blankets, warm lighting, and comfortable seating for moments of relaxation.</span></li>
<li><span style="font-family: Raleway; font-weight: 400;">Set aside dedicated time for Fika, inviting friends or family to join you for a coffee break accompanied by homemade treats.</span></li>
<li><span style="font-family: Raleway; font-weight: 400;">Fill your space with the comforting scents of freshly baked goods or aromatic candles to enhance the cozy ambiance.</span></li>
<li><span style="font-family: Raleway; font-weight: 400;">Practice mindfulness while enjoying your Fika or Hygge moments, allowing yourself to fully immerse in the experience.</span></li>
<li><span style="font-family: Raleway; font-weight: 400;">Explore Nordic recipes and incorporate traditional Fika treats into your baking repertoire.</span></li>
<li><span style="font-family: Raleway; font-weight: 400;">Share the joy of Fika and Hygge with others by hosting cozy gatherings or gift-giving moments that celebrate togetherness.</span></li>
</ol>
<p><span style="font-family: Raleway; font-weight: 400;">Conclusion: Swedish Fika and Danish Hygge offer a delightful escape from the demands of modern life, reminding us to slow down, appreciate the present moment, and find joy in simplicity. By embracing these traditions, we can create more meaningful connections, foster relaxation, and cultivate a sense of well-being. So, why not carve out a moment for Fika or infuse your life with Hygge? Give yourself permission to indulge in the cozy comforts that these Nordic traditions have to offer and let them bring warmth and fulfillment to your days.</span></p>
<p> </p>]]>
            </summary>
                            <link rel="enclosure" href="https://static.subbly.me/fs/subbly/userFiles/nordic-bakebox/images/a-27-img0285-16873185968191.jpeg" length="283777" type="image/jpeg" />
                        <category term="Uncategorised" />
            <updated>2023-06-21T03:31:43+00:00</updated>
                            <dc:description><![CDATA[Discover the enchanting world of Swedish Fika and Danish Hygge in this blog post. Explore the art of slowing down, savoring moments, and finding comfort in simple pleasures. Learn how to incorporate Fika and Hygge into your daily routine, create cozy spaces, and foster meaningful connections. Embrace the joy of Fika treats and the cozy ambiance of Hygge. Find balance, mindfulness, and well-being through these Nordic traditions. Immerse yourself in the warmth of Fika and Hygge and elevate your everyday life.]]></dc:description>
                    </entry>
            <entry>
            <title><![CDATA[Sourdough crackers - how to use your sourdough discard]]></title>
            <link rel="alternate" href="https://www.nordicbakebox.com.au/blog/recipes/sourdough-crackers-how-to-use-your-sourdough-discard" />
            <id>https://www.nordicbakebox.com.au/blog/recipes/sourdough-crackers-how-to-use-your-sourdough-discard</id>
            <author>
                <name><![CDATA[Isabelle Melville]]></name>
                                    <email><![CDATA[isabelle@nordicbakebox.com.au]]></email>
                            </author>
            <summary type="html">
                <![CDATA[<p><span style="font-family: Lato; font-weight: 100;">Easy sourdough crackers made with sourdough discard and only three more ingredients!</span><br><span style="font-family: Lato; font-weight: 100;">A good way to use your sourdough discard, instead of wasting it. Just add some oil, mix it together.  Spread it out on an oven tray covered with baking paper. Spread it with a thin layer, then sprinkle with salt and your favourite spices or herbs. Bake in the oven for 250c bake for 10 min or until golden. </span></p>
<p><span style="font-family: Lato; font-weight: 100;">Cut them up into squares before letting them cool. Enjoy!</span></p>
<p> </p>
<h5><span style="font-weight: 100; font-family: Lato;">Ingredients:</span></h5>
<ul class="wprm-recipe-ingredients">
<li class="wprm-recipe-ingredient" data-uid="0"><span style="font-family: Lato; font-weight: 100;"><span class="wprm-recipe-ingredient-unit-system wprm-recipe-ingredient-unit-system-1"><span class="wprm-recipe-ingredient-amount">¾</span> <span class="wprm-recipe-ingredient-unit">cup</span> </span><span class="wprm-recipe-ingredient-unit-system wprm-recipe-ingredient-unit-system-2">(<span class="wprm-recipe-ingredient-amount">200</span> <span class="wprm-recipe-ingredient-unit">g</span>)</span> <span class="wprm-recipe-ingredient-name"><a class="wprm-recipe-ingredient-link" href="https://littlespoonfarm.com/sourdough-starter-recipe/">discarded sourdough starter</a></span> <span class="wprm-recipe-ingredient-notes wprm-recipe-ingredient-notes-smaller-faded">(stirred down)</span></span></li>
<li class="wprm-recipe-ingredient" data-uid="1"><span style="font-family: Lato; font-weight: 100;"><span class="wprm-recipe-ingredient-unit-system wprm-recipe-ingredient-unit-system-1"><span class="wprm-recipe-ingredient-amount">2</span> <span class="wprm-recipe-ingredient-unit">tablespoons</span> </span><span class="wprm-recipe-ingredient-unit-system wprm-recipe-ingredient-unit-system-2">(30 <span class="wprm-recipe-ingredient-unit">g</span>)</span> of olive oil</span></li>
<li class="wprm-recipe-ingredient" data-uid="3"><span style="font-family: Lato; font-weight: 100;"><span class="wprm-recipe-ingredient-unit-system wprm-recipe-ingredient-unit-system-1"><span class="wprm-recipe-ingredient-amount">2</span> <span class="wprm-recipe-ingredient-unit">teaspoons</span> of favourite herbs or spices</span></span></li>
<li class="wprm-recipe-ingredient" data-uid="3"><span style="font-family: Lato; font-weight: 100;"><span class="wprm-recipe-ingredient-unit-system wprm-recipe-ingredient-unit-system-1">1/2 <span class="wprm-recipe-ingredient-unit">teaspoon</span> </span><span class="wprm-recipe-ingredient-unit-system wprm-recipe-ingredient-unit-system-2">(3 <span class="wprm-recipe-ingredient-unit">g</span>)</span> <span class="wprm-recipe-ingredient-name">salt for sprinkling on top</span></span></li>
</ul>]]>
            </summary>
                            <link rel="enclosure" href="https://static.subbly.me/fs/subbly/userFiles/nordic-bakebox/images/a-26-blogcrackers-16867063744905.jpeg" length="76029" type="image/jpeg" />
                        <category term="Recipes" />
            <updated>2023-06-09T10:28:23+00:00</updated>
                            <dc:description><![CDATA[Easy recipe for sourdough crackers made from sourdough discard]]></dc:description>
                    </entry>
            <entry>
            <title><![CDATA[How to get perfect cinnamon buns - 7 tips on how to succeed]]></title>
            <link rel="alternate" href="https://www.nordicbakebox.com.au/blog/baking-tips/how-to-get-perfect-cinnamon-buns-7-tips-on-how-to-succeed" />
            <id>https://www.nordicbakebox.com.au/blog/baking-tips/how-to-get-perfect-cinnamon-buns-7-tips-on-how-to-succeed</id>
            <author>
                <name><![CDATA[Isabelle Melville]]></name>
                                    <email><![CDATA[isabelle@nordicbakebox.com.au]]></email>
                            </author>
            <summary type="html">
                <![CDATA[<p style="text-align: left; line-height: 1.3;"><span style="font-family: Lato; font-weight: 100;">   A homemade cinnamon bun and a nice cup of coffee, is probably as good as life get, don't you think?</span><span style="font-family: Lato; font-weight: 100;"> </span></p>
<p style="text-align: left; line-height: 1.3;"><span style="font-family: Lato; font-weight: 100;">   The goal is to get cinnamon buns deliciously juicy so that they just melt in your mouth.</span><span style="font-family: Lato; font-weight: 100;"> So here are our best tips for getting really </span></p>
<p style="text-align: left; line-height: 1.3;"><span style="font-family: Lato; font-weight: 100;">   fluffy cinnamon buns with lots of buttey cinnamon flavor. </span><span style="font-weight: 100;"><span style="font-family: Lato;">Just like the ones you buy at bakeries in the Nordics!</span></span></p>
<ol>
<li><span style="font-weight: 100;"><span style="font-family: Lato;"><span style="font-weight: 300;">First, make sure to use room temperature ingredients.</span> Set everything out for a while before baking, it is important that the milk is luke warm so that it activates the yeast.</span></span></li>
<li><span style="font-weight: 300;"><span style="font-family: Lato;">Avoid the yeast coming into contact with the sugar and salt. </span></span><span style="font-weight: 100;"><span style="font-family: Lato;">Sugar and salt are a disturbance to the fermentation process of the yeast. Therefore, wait to add the sugar and salt until you have added the flour, to get the best result from your yeast and have a nice rise in your dough.</span></span></li>
<li><span style="font-weight: 100;"><span style="font-family: Lato;"><span style="font-weight: 300;">Work the dough for a long time! At least 10 minutes by machine or by hand.</span> You know the dough is ready when it has enough gluten threads and is elastic. You check this by taking a piece of dough and carefully strech it out really thin. If the dough does not break, you have strong gluten threads and thus you have worked the dough long enough. The dough should also look shiny and not be as sticky any more.</span></span></li>
<li><span style="font-weight: 100;"><span style="font-family: Lato;"><span style="font-weight: 300;">Shape the buns before you let them rest and rise, and the dough will be easier to work with. </span>The dough is stiffer before it starts to rise and that is the reason why it is easier to work with. We therefore always fill and shape the buns immediately after kneading and then let them rise for a few hours before baking them in the oven.</span></span></li>
<li><span style="font-weight: 100;"><span style="font-family: Lato;"><span style="font-weight: 300;">Let the dough rest and rise. </span>It's important to give it time to rise properly, but don't leave the buns for too long.<br>How much time they need depends on the temperature and humidity so depending on what time of year it is, it can take anywhere from 1-2 hours. To be sure they are ready, test by pressing gently on a bun, and if the dough "bounces back" they are ready.</span></span></li>
<li><span style="font-weight: 100;"><span style="font-family: Lato;"><span style="font-weight: 300;">Add a little salt and a little water to the beaten egg used to brush the buns. </span>It dissolves the egg and makes it much easier to brush with. This avoids lumps of fried egg on the ready-baked buns.</span></span></li>
<li><span style="font-family: Lato; font-weight: 100;"><span style="font-weight: 300;">Make the buns vegan.</span> Do this by replacing the butter with dairy-free margarine and the milk with soya or oat milk. The cinnamon buns are can also be brushed with the plantbased milk instead of egg.</span></li>
</ol>]]>
            </summary>
                            <link rel="enclosure" href="https://static.subbly.me/fs/subbly/userFiles/nordic-bakebox/images/a-24-productbuns-16867064471021.jpeg" length="1750134" type="image/jpeg" />
                        <category term="Baking tips" />
            <updated>2023-06-09T04:34:55+00:00</updated>
                            <dc:description><![CDATA[How to bake perfect cinnamon buns .
Baking instructions to succeed with your baking]]></dc:description>
                    </entry>
            <entry>
            <title><![CDATA[Sourdough bread recipe - to use with your starter]]></title>
            <link rel="alternate" href="https://www.nordicbakebox.com.au/blog/recipes/sourdough-bread-recipe-to-use-with-your-starter" />
            <id>https://www.nordicbakebox.com.au/blog/recipes/sourdough-bread-recipe-to-use-with-your-starter</id>
            <author>
                <name><![CDATA[Isabelle Melville]]></name>
                                    <email><![CDATA[isabelle@nordicbakebox.com.au]]></email>
                            </author>
            <summary type="html">
                <![CDATA[<p class="p1"><span style="font-size: 14px; font-family: Lato; font-weight: 100;">An easy sourdough recipe to use with our starter.</span></p>
<p class="p1"><span style="font-family: Lato; font-size: 14px; font-weight: 100;">Sourdough bread contains higher levels of vitamins, minerals, and antioxidants than other breads.</span></p>
<p class="p1"><span style="font-family: Lato; font-size: 14px; font-weight: 100;"> It also contains lower levels of phytate and therefore allows your body to absorb the nutrients it contains more easily than those in regular bread.</span></p>
<p class="p1"> </p>
<p class="p1"><span style="font-family: Lato; font-size: 14px; font-weight: 100;">The recipe calls for an active starter so make sure you have reviewed your starter before starting.</span></p>
<p class="p1"> </p>
<p class="p1"><span class="s1" style="font-family: Lato; font-size: 14px; font-weight: 100;"><strong>Ingredients:</strong></span></p>
<p class="p2"><span class="s1" style="font-family: Lato; font-size: 14px; font-weight: 100;">250 g active starter </span></p>
<p class="p3"><span class="s1" style="font-family: Lato; font-size: 14px; font-weight: 100;">760 g water + 10 g of water when you add the salt </span></p>
<p class="p3"><span class="s1" style="font-family: Lato; font-size: 14px; font-weight: 100;">750 g all purpose flour<span class="Apple-converted-space">  </span>(always use unbleached)</span></p>
<p class="p3"><span class="s1" style="font-family: Lato; font-size: 14px; font-weight: 100;">300g wholewheat flour</span></p>
<p class="p3"><span class="s1" style="font-family: Lato; font-size: 14px; font-weight: 100;">24 g salt</span></p>
<p class="p3"> </p>
<p class="p4"><strong><span class="s1" style="font-size: 14px; font-family: Lato;">Directions</span></strong></p>
<p class="p5"><span style="font-family: Lato; font-size: 14px; font-weight: 100;"><strong><span class="s2">Step 1</span></strong></span></p>
<p class="p5"><span class="s3" style="font-family: Lato; font-size: 14px; font-weight: 100;">Add your active starter to a bowl. Add the water.<br>Mix starter with the water until it looks like milk and then add all the flour.<br>Mix it all together for 2-3 minutes and cover your bowl and let it sit for 30 min</span></p>
<p class="p6"><span class="s1" style="font-family: Lato; font-size: 14px; font-weight: 100;"><span class="Apple-converted-space">  </span></span></p>
<p class="p7"><span style="font-family: Lato; font-size: 14px; font-weight: 100;"><strong><span class="s1">Step 2</span></strong></span></p>
<p class="p7"><span style="font-family: Lato; font-size: 14px; font-weight: 100;"><span class="s1">Add the salt and 10 g of water. </span><span class="s1">Knead the dough for about 3- 5 minutes, until water and salt are fully incorporated. </span></span></p>
<p class="p3"><span style="font-family: Lato; font-size: 14px; font-weight: 100;"><span class="s1">Cover again and let rest for 30 minutes. </span><span class="s1">Over the next 1.5-2 hours, perform 3-4 sets of stretch and folds, cover and let the dough rest after each series.  </span><span class="s1">Cover the dough and let it rest at room temperature until doubled in size. OR place it in the fridge for 8-10 hours for a slower fermentation. This method is best. A tip is to start the bread at night and have it ferment in the fridge overnight.</span></span></p>
<p class="p3"> </p>
<p class="p3"><strong><span class="s1" style="font-family: Lato; font-size: 14px;">Step 3</span></strong></p>
<p class="p3"><span style="font-family: Lato; font-size: 14px; font-weight: 100;">Pour out the dough onto the bench and divide it into two.</span></p>
<p class="p3"><span class="s1" style="font-family: Lato; font-size: 14px; font-weight: 100;">Spread the dough out a bit into a square shape, fold over the sides first, then roll it up. The dough will be a little sticky, you can add flour to the bench. Once rolled up, push it away from you, and then pull towards you to build tension in the dough. Do that 3-4 times until your loaf is round and bouncy. Repeat with the second loaf. After your first shape, leave the loaves on the counter uncovered for 20 minutes.<br>After 20 minutes, form the bread once more. You will find that the dough is less sticky the second time.</span></p>
<p><span style="font-family: Lato; font-size: 14px; font-weight: 100;">Carefully turn the loaves over and place them into the floured proofing baskets and cover with a tea towel. Leave the baskets for about an hour.</span></p>
<p> </p>
<p><strong><span style="font-family: Lato; font-size: 14px;">Step 4</span></strong></p>
<p><span style="font-family: Lato; font-size: 14px; font-weight: 100;">Flip the dough out of the baskets onto a sheet of parchment paper. Score your bread in a desiered pattern. Use the parchment paper to lift the dough, place it into a preheated castiron pot, put the lid back on the pot and put it immediately into the oven. Bake the bread for 30 minutes at 250°C. Remove the lid and put back in the oven for another 20 minutes or until golden brown.</span><br><span style="font-family: Lato; font-size: 14px; font-weight: 100;">Let the bread cool completely before slicing it. Congrats you have made an awsome sourdough bread!</span></p>
<p> </p>
<p><strong><span style="font-family: Lato; font-size: 14px;">Step 5</span></strong></p>
<p><span style="font-family: Lato; font-size: 14px; font-weight: 100;">Eat and enjoy!</span></p>
<p class="p3"> </p>
<p class="p3"> </p>]]>
            </summary>
                            <link rel="enclosure" href="https://static.subbly.me/fs/subbly/userFiles/nordic-bakebox/images/a-23-productbread-1686706507097.jpeg" length="280440" type="image/jpeg" />
                        <category term="Recipes" />
            <updated>2023-06-05T05:41:00+00:00</updated>
                            <dc:description><![CDATA[recipie for tasty easy sourdough bread. How to bake sourdough bread.]]></dc:description>
                    </entry>
            <entry>
            <title><![CDATA[Can my sourdough starter go bad?]]></title>
            <link rel="alternate" href="https://www.nordicbakebox.com.au/blog/bread/can-my-sourdough-starter-go-bad" />
            <id>https://www.nordicbakebox.com.au/blog/bread/can-my-sourdough-starter-go-bad</id>
            <author>
                <name><![CDATA[Isabelle Melville]]></name>
                                    <email><![CDATA[isabelle@nordicbakebox.com.au]]></email>
                            </author>
            <summary type="html">
                <![CDATA[<p style="font-size: 14px;"><span style="font-size: 14px; font-family: Lato; font-weight: 100;">Mould is one of the most common food contaminants.</span><br><span style="font-size: 14px; font-family: Lato; font-weight: 100;">Not all types of mould are bad for you if eaten, there are several examples of good mould like the one you find in some cheeses. Having said that, you should have good mould in your starter!</span></p>
<p><br><span style="font-size: 14px; font-family: Lato; font-weight: 100;">How do I know if it's bad mould?</span></p>
<p><span style="font-size: 14px; font-family: Lato; font-weight: 100;">Mould is usually fuzzy/furry looking. The lactic acid bacteria naturally deter mould growth, which makes it very hard for mould to grow in a starter and therefore very unlikely to develop.</span></p>
<p> </p>
<p><span style="font-size: 14px; font-family: Lato; font-weight: 100;">If you still think you have mould in your starter, then that could be for two reasons, either the starter has been standing in two high temperature for too long or poor hygiene when handling your starter. Like a dirty jar, or dirty hands/ spoons in your starter.</span></p>
<p> </p>
<p><span style="font-size: 14px; font-family: Lato; font-weight: 100;">Mould takes a long time to grow, so for a starter to go bad, it usually means it's been neglected for a long time. So to prevent this from happening you should maintain your sourdough culture regularly.</span></p>
<p> </p>
<p><span style="font-size: 14px; font-family: Lato; font-weight: 100;">Some tips for prevention your starter going bad.</span></p>
<p><span style="font-size: 14px; font-family: Lato; font-weight: 100;">After each feeding, clean the outside of the walls of the jar clean with a paper towel. Contamination can happen in the walls where there are some old starter left.<br>Feed your starter regularly, at least once per week if you have it stored in room temperature, if you have it in your fridge feed it at least every 2-3 weeks.</span></p>
<p> </p>
<p><span style="font-size: 14px; font-family: Lato; font-weight: 100;">Just keep good hygiene by keeping the jar clean and mould or bad bacteria won't trouble you. Love your starter and show that love by feeding it regularly. </span></p>]]>
            </summary>
                            <link rel="enclosure" href="https://static.subbly.me/fs/subbly/userFiles/nordic-bakebox/images/a-22-blogsourdough-16867065586001.jpeg" length="118180" type="image/jpeg" />
                        <category term="Bread" />
            <updated>2023-06-05T05:23:14+00:00</updated>
                            <dc:description><![CDATA[A sourdough starter is bad if it contains mould. ]]></dc:description>
                    </entry>
            <entry>
            <title><![CDATA[What is a sourdough starter?]]></title>
            <link rel="alternate" href="https://www.nordicbakebox.com.au/blog/bread/what-is-a-sourdough-starter" />
            <id>https://www.nordicbakebox.com.au/blog/bread/what-is-a-sourdough-starter</id>
            <author>
                <name><![CDATA[Isabelle Melville]]></name>
                                    <email><![CDATA[isabelle@nordicbakebox.com.au]]></email>
                            </author>
            <summary type="html">
                <![CDATA[<p><span style="font-family: Lato; font-weight: 100;">All sourdough starters out there are made up by different yeast cultures. This means that it is very hard to say with certainty which yeast or bacteria that lives in your sourdough starter. There are several things that will contribute to this. First the ingredient the water and the flour that is used, but also the place where the starter started and by whom.The combination of the bacteria from the kitchen, the water, the flour makes every starter unique. </span></p>
<p><br><span style="font-family: Lato; font-weight: 100;">Having said that, the microorganisms in sourdough starters do contain a combination of both wild yeast and lactic acid bacteria.These two “eats” or ferment the sugar in the flour that results in bubbles and its the bubbles that makes your dough rise to a bigger size.</span></p>
<p> </p>
<p><span style="font-family: Lato; font-weight: 100;">What happens next is that the bacteria break down the left over products from the fermentation process which produces lactic and acetic acid and these two are what gives the characteristic sour flavour of sourdough bread.</span></p>
<p> </p>
<p><span style="font-family: Lato; font-weight: 100;">They also lower the pH  of the bread which works as a preservative, and that prevents the bread from going bad as fast as bread made without it</span></p>
<p class="p1"><span class="s1" style="font-family: Lato; font-weight: 100;">Both yeast and bacteria live in sourdough starters and are needed and normal. The yeast and bacteria are the good guys and we need them to make our delicious sourdough bread!</span></p>]]>
            </summary>
                            <link rel="enclosure" href="https://static.subbly.me/fs/subbly/userFiles/nordic-bakebox/images/a-21-img9519-16867065975042.jpeg" length="81176" type="image/jpeg" />
                        <category term="Bread" />
            <updated>2023-06-05T04:51:45+00:00</updated>
                            <dc:description><![CDATA[sourdough starter description]]></dc:description>
                    </entry>
            <entry>
            <title><![CDATA[How is rye beneficial to your health?]]></title>
            <link rel="alternate" href="https://www.nordicbakebox.com.au/blog/bread/what-is-the-health-benifits-of-rye-1" />
            <id>https://www.nordicbakebox.com.au/blog/bread/what-is-the-health-benifits-of-rye-1</id>
            <author>
                <name><![CDATA[Isabelle Melville]]></name>
                                    <email><![CDATA[isabelle@nordicbakebox.com.au]]></email>
                            </author>
            <summary type="html">
                <![CDATA[<p><span style="font-size: 14px; font-family: Lato; font-weight: 100;">Rye's history</span></p>
<p><span style="font-size: 14px; font-family: Lato; font-weight: 100;">Rye has traditionally been used for baking crisp bread and bread and sourdough bread.</span><br><span style="font-size: 14px; font-family: Lato; font-weight: 100;">In the Nordic countries, rye has been cultivated since the 11th century. Rye was an important crop for the working population and a crucial part of the staple food for a long period of time.</span></p>
<p> </p>
<p><span style="font-size: 14px; font-family: Lato; font-weight: 100;">What health benefits does rye have?</span></p>
<p><span style="font-size: 14px; font-family: Lato; font-weight: 100;">Rye contains the most dietary fiber of the common cereals and gives a good feeling of satiety, this makes rye ideal for breakfast! Rye fibers are good for intestinal health and contribute to normal bowel function. Rye is also an excellent source of fiber.</span><br><span style="font-size: 14px; font-family: Lato; font-weight: 100;">It Contains 20 g of fiber per 100g. 100 grams of rye a day provides up to 50% of the recommended daily intake of several important vitamins and minerals. Some of these important vitamins include E and B vitamins, as well as minerals such as calcium, magnesium, zinc and iron.You get 100g of rye if you eat 2 slices of whole grain rye bread. Rye also keep you fuller for longer then wheat and it contains less gluten.</span></p>
<p> </p>
<p><span style="font-size: 14px; font-family: Lato; font-weight: 100;">On top of all these amazing benefits, it's also anti-inflamatory which means that it can help prevent diseases such as type 2 diabetes and various types of cardiovascular disease. </span></p>
<pre id="tw-target-text" class="tw-data-text tw-text-large tw-ta" dir="ltr" data-placeholder="Translation"><span class="Y2IQFc" lang="en"><br><br></span></pre>]]>
            </summary>
                            <link rel="enclosure" href="https://static.subbly.me/fs/subbly/userFiles/nordic-bakebox/images/a-18-blogryebread-16867116172522.jpeg" length="372668" type="image/jpeg" />
                        <category term="Bread" />
            <updated>2023-06-05T03:46:21+00:00</updated>
                            <dc:description><![CDATA[health benifits of rye bread. ]]></dc:description>
                    </entry>
    </feed>
